
In this tutorial, I show you how to make a simple DIY baseball lamp.
This super easy DIY baseball decor project adds needed light fixtures to a man cave or baseball player’s room.
This simple lamp features a wood home plate, a lamp rod with baseballs, and a common lamp shade.
Below are some jump links to the main sections of this post to help you find the information you need quickly.
Tools and Material
Video Tutorial
Step-by-Step Instructions
Tools and Material
- Lamp Kit
- All Thread Lamp Pipe Kit
- Irwin Combination Square
- Band Saw or Jigsaw
- 4 Baseballs
- Disc Sander or Orbital Sander
- Digital Caliper
- Drill Press or Cordless Drill
- Drill Press Vise 4″
- Hardwax Oil
- Handheld Router
- Hot Glue Gun
- Lamp Shade
- 8″ (length) x 8″ (width) x 1″ (thickness) square piece of wood
- I used a piece of scrap IPE in my shop.


Video Tutorial
There are many things which are difficult to explain with words and images, so be sure to checkout the video tutorial below.
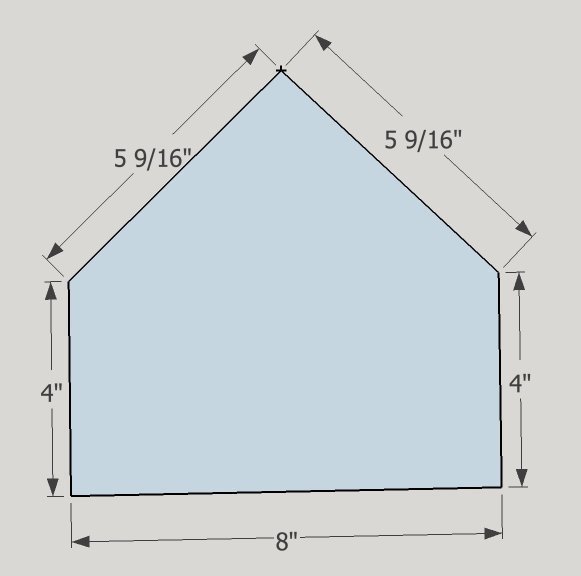
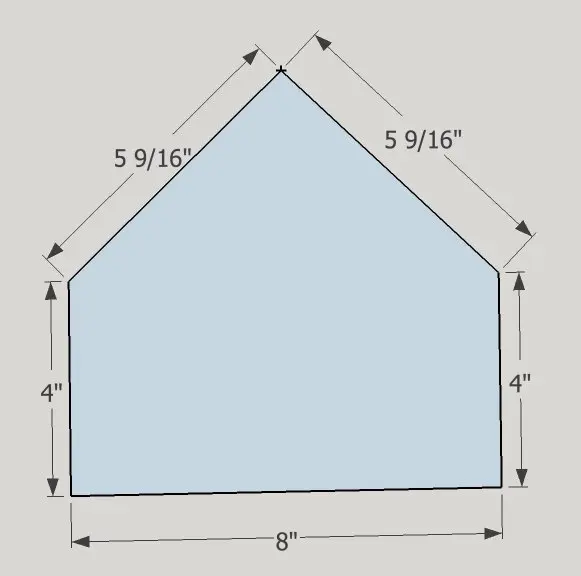
Home Plate Lamp Holder Dimensions
First, find or cut any piece of wood that is 8″ x 8″ square to be the base of the diy baseball lamp (home plate).
Luckily, I had a piece of IPE laying around my wood shop from a previous project that was 9″ x 9″.
Essentially, you can change the size of home plate as long as you follow these measurement guidelines:
Back of home plate = x. Each side of home plate = x / 2.
The 2 remaining sides are set at a 45 degree angle until they intersect.
Furthermore, the standard size of home plate is 17″ (Back) x 8.5″ (straight side) x 12″ (angled sides).
Cut Home Plate
First, trace home plate on your chosen piece of material with a pencil and a combination square.
I chose a scrap piece of IPE wood.
You don’t need to use high-grade material for this project.
Next, cut out the plate with a straight cut using a jigsaw or bandsaw.
Keep in mind, a curved cut isn’t necessary.
Remember, always cut outside the lines.


Sand to Lines
The really cool thing about cutting outside the lines is you get to sand up to the line accurately.
Sand home plate up to the lines using a disc sander, drum sander, or a hand sander.
The best choice is the disc sander.
Medium grit-sanding pad or paper work well for sanding excess.
If you see swirl marks, you can use a fine grit-sanding pad or paper afterwards.


Mark Baseball
First, make a mark on the baseballs in the same general area with a pencil.
I chose an area on the ball that would minimize the logo/emblem once stacked on each other.


Also, I chose 4 baseballs because they fit on the threaded rod perfectly with about a half inch of thread remaining on each side.
Measure Lamp Rod
First, use a digital caliper, regular caliper, or any measuring device to measure the width of the threaded rod.
As you can see, the rod one is 3/8″.
The threaded rod serves as a nice metal tube for the electrical set of wires to go through.


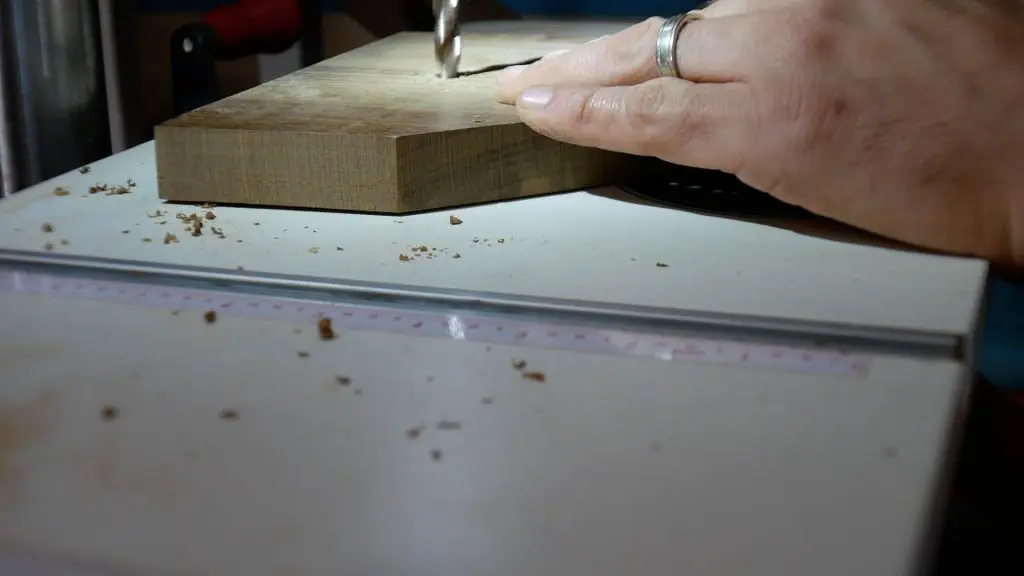
Drill Hole in Baseball
First, secure the ball with clamps or a vise.
Next, drill a hole using a drill press or hand drill on the mark with a drill bit slightly larger than the rod.
The holes I drilled were too small for the rod to fit, so I stepped up to a 1/2″ bit.


Lamp Rod Assembly
First, place the baseballs on the threaded rod and secure them in place with the lock nuts/washers that came with the lamp kit.
Next, make sure to leave about a half inch of threaded rod on each end.
This allows you to easily secure the remaining lamp pieces and it can be attached to the base plate.
Also, detailed instructions on how to assemble the different nuts/washers come with the lamp kit.
However, I didn’t use some of them b/c the lamp was already secure.


Thread Wire
Carefully thread the wire through the rod.


Next, attach the remaining pieces for the DIY baseball lamp kit to one side.


Find Center
Find the center of the plate using a combination square, speed square, or tape measure and mark the center with a pencil.
This is where you will drill the hole for the threaded pipe.
Depending on the size of your base, you may want to move the mark 1 or 2 inches back.
My home plate is rather small and having the lamp directly in the center did not look right.


Drill Hole in Base
Drill a hole using a drill or drill press the same size as the threaded rod, which was 3/8″ in my case.
This hole can always be widened later if needed.
You may want to place a scrap of wood on the underside of the plate to prevent tear out.

Roundover Edges
Use a router with a 1/4″ roundover bit on the top edges.
You can also use an orbital sander, or sandpaper to accomplish this as well.


Wood Sanding
First, sand the entire plate using 80 grit, then 120 grit, then 220 grit sandpaper.
This will provide a very smooth surface.
If you want an impressive result with a mirror finish, sand beyond 220 with 320 then 400 grit sandpaper.


Apply Finish
First, use a damp rag or paper towel to remove the dust from the wood and raise the grain.
Optional: While the wood is damp, you can quickly sand it again with 220 grit paper.
Essentially, this will make a very smooth surface since the dampness in the wood raises the grain.


Apply your favorite finish to the wood for the DIY baseball lamp.


Conceal Wire
First, use a router with a straight bit or v-groove bit to cut a 1/4″ channel on the underside of the plate to the hole.
Don’t cut too deep – just wide and deep enough for the lamp cord.
This provides a channel for the baseball lamp cord to rest in order for the lamp to sit flat on the surface & to hide the cord.
Also, I used a v-groove bit set at 1/4″ deep.
I kept the line as straight as possible, but didn’t concern myself with it too much because this will be on the underside of the plate.

Attach Lamp Rod to Base
First, pull the excess lamp wire through the hole in the base from the baseball lamp.

Next, test the rod to make sure it fits in the hole.
There are a few ways to secure the rod to the plate.
Since I used IPE, I was able to simply screw the rod into the 3/8″ hole I drilled.
As a result, it fit perfectly.
If you are using a softer wood like Pine, you will need to secure the rod to the plate using the provided nuts/washers in the kit.
The kit contains detailed instructions on how to do this.

Hot Glue Wire
Before proceeding to this step, get a light bulb and test the baseball lamp to make sure it works.
Once the rod is secured to the plate and you verified the lamp works, use glue to secure it inside the channel.
I recommend you use hot glue b/c it dries within 5-10 minutes and can easily be removed if needed to do repairs to the lamp.

Final Assembly
First, install the remaining baseball lamp hardware for the top of the lamp along with a shade of your choice.
I used the lamp shade from the lamp I replaced and it worked fine.


Conclusion
In conclusion, this DIY baseball lamp project was cheap and took me roughly an hour to make from start to finish.
It looks great on a side table or in a man cave.
This is a great project for baseball fans or a gift before baseball season.
Additionally, I encourage you to be creative by adding different things to the lamp like a glove on the bottom or your own baseball bat lamp.
Good luck with your project.
Related Posts
Greg
Sunday 10th of January 2021
Dude, I love it. I made my own just waiting on lamp shade.
Pahjo Designs
Monday 11th of January 2021
Awesome man. Send a pic of your lamp - I'd love to see it.