
In this full tutorial, discover how to setup a home NAS (network-attached storage) for secure file sharing and data backup.
Video Tutorial
There are several things which are difficult to fully explain with words and images, so be sure to check out the video tutorial below.
Why a Home NAS?
Most people don’t have a reliable home data backup solution. They focus on storing their data on single storage devices such as external drives.
Even worse, they realize their home data backup solution does not work after it’s too late.
So today, we are going to take a different approach.
We will show you how to properly safeguard your data using the 3-2-1 backup strategy.
Lets get started with a list of things needed for this solution.
Things I Used
Synology 923+ (Updated Model)Seagate 4TB Hard Drive (Qty 3)
BackBlaze Cloud Backup Service
Eero Mesh WiFi System
Ubiquiti UniFi Switch
Home Server Cabinet
Home NAS System
A reliable home data backup solution and a scalable home data storage solution are very important.
In fact, a reliable home backup solution is beyond important – more along the lines of vital.
Most people rely solely on digital media to record precious family moments, store financial documents, and much more.
Really, who still prints pictures & burns DVDs nowadays?
Luckily, a NAS server is now affordable for the home user.
In fact, most can be configured with a simple web browser via a web interface.
As a result, I decided to purchase and install a Synology NAS (Network Attached Storage) home data storage solution after months of research.
Ultimately, the Synology home data backup solution will enhance my backup process, consolidate my data, and further protect my memories.
Also, the home network attached storage I purchased functions as a home video media server.
Properly Backup Data
Most of us believe our current home data backup solution is sufficient.
Mobile devices back up automatically to the cloud.
Time machine backups and PC backups are stored on external hard disks or a usb flash drive.
Therefore, files are safe.
Well, every home backup solution works perfectly fine – until it doesn’t.
All the home videos, pictures, documents, and emails your cherish suddenly disappear.
I’ve seen friends and co-workers over the years suffer a digital catastrophe and lose everything.
It truly is devastating and it hurts.
I work in the technology industry and this happens to data professionals.
Data professionals who know how to properly protect data.
You see, the danger lies in the unknown.
Ever heard of Murphy’s law?
If not, look it up because this law is all too prevalent in the world of technology.
3-2-1 Backup Rule
Every single home data backup solution is vulnerable to a physical catastrophe, virtual glitch, or cyber attack
In order to properly backup your data, a multi-tiered approach is of the utmost importance.
I follow the Backup 3-2-1 Rule, which is very common among data/technology professionals.
A multi-tiered data protection configuration is the Data Backup Rule of 3.
Also referred to as the Backup 3-2-1 Rule.
What is the 3-2-1 Backup Strategy
This rule simply states you should have 3 copies of your data, the copies are stored on 2 different types of storage media and 1 copy stored offsite.
Current Home Data Backup Solution
A consolidated diagram of my current home network before the Synology NAS installation is below.
I won’t cover the details of the configuration of each component within my home network as this is beyond the scope of how to setup a home NAS.
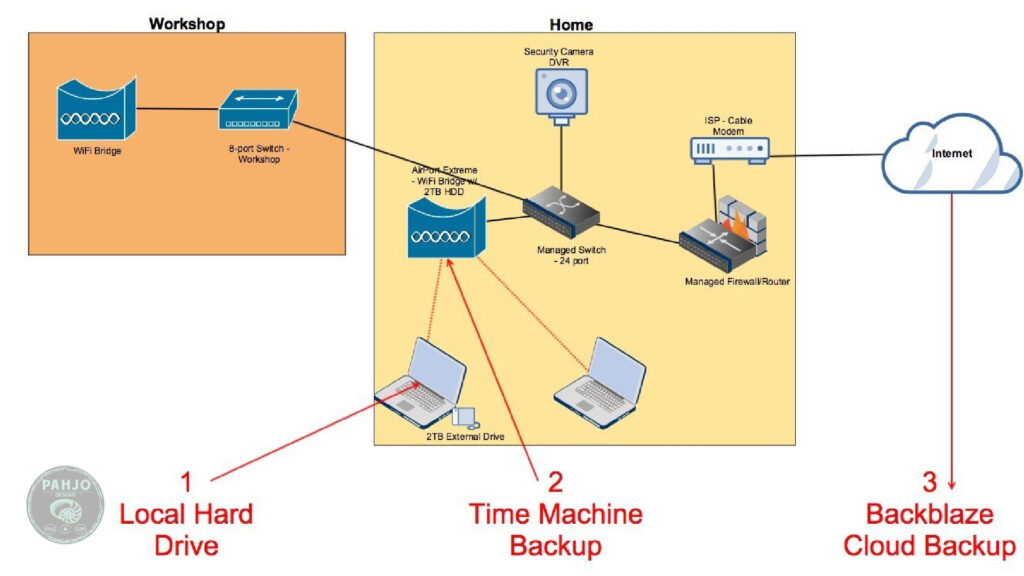

Home Network Setup
Currently, my home network consists of a firewall/router connected to my Internet provider (cable company).
The LAN (Local Area Network) side of my firewall/router connects to a 24-port switch.
All devices within my home network connect directly or indirectly to this switch.
In addition, I use an Apple Airport extreme for my wireless connectivity in my main home, which also has a 2TB hard drive.
Also, I have an ethernet cable connecting my workshop to my main home with 8-port switch and a wireless bridge in my workshop.
Ethernet Switch Advantages
Why is the 24-port switch necessary? It’s not if you have enough LAN ports on your router/firewall to accommodate your wired connections.
The main benefit of having a switch is not only to provide additional ports, but also to keep traffic within your home network from adding unnecessary stress on your router.
For example, you have a computer connected to your network in your home with all your home movies.
The TV in your living room has a streaming device (Apple TV, Amazon Firestick, etc.) that can access your home movie library.
When a movie is played via the streaming device, the data stream travels from your computer to the switch down to the streaming device.
If a switch was not installed, the data stream would travel from your computer to your router back down to your streaming device.
Home Data Backup Solution Overview
The current home data storage solution for my MacBook Pro and my wife’s MacBook Air consists of 3 copies of our data: Local Hard Drive, Time Machine, Cloud Backup.
Local External Hard Drive
The local hard drive may seem like a given, but it counts as a copy nonetheless.
My wife and I use apple laptops.
Therefore, we use the built-in backup solution called Time Machine.
Time Machine Backup
The time machine software runs in the background and stores an exact copy of your hard drive on an external drive.
The external drive we use is the 2TB Airport extreme, which also provided us 802.11ac wireless access.
Off-Site Backup (Cloud Storage)
Finally, we use Backblaze for our offsite home data backup solution.
Backblaze quietly runs in the background of our computers and backups up all of our data including external hard drives.
Furthermore, Backblaze works on both Mac & PC and charges a very reasonable annual fee for unlimited storage space.
I’ve tried many cloud backup solutions and Backblaze is the best by far in my experience.
I encourage you to sign up for your free Backblaze trial by clicking here.
Home Data Backup Issues and Improvements
Ok, so what is wrong with our current home data backup solution?
Essentially, there is nothing necessarily wrong, but it can be improved with additional functionality and redundancy.
Issue #1: Apple Airport Extreme does not contain enough disk space.
The 2tb hard drive in the airport extreme for time machine backups is not large enough for 2 computers and digital media.
It does not have enough disk space to include my 2tb external hard drive attached to my computer in the time machine backups.
In addition, I must exclude files from time machine backups and rely solely on backblaze to backup these items.
Issue #2: No Disk Redundancy
The time machine backups cease to exist if the 2tb disk in the apple airport extreme fails.
Issue #3: Access to Digital Media
My home movies reside on the external hard drive attached to my computer.
As a result, my computer must be on and connected to my local network in order to access home videos.
Furthermore, my iTunes library and photos library reside on my external hard drive.
Improved Home Data Backup Solution
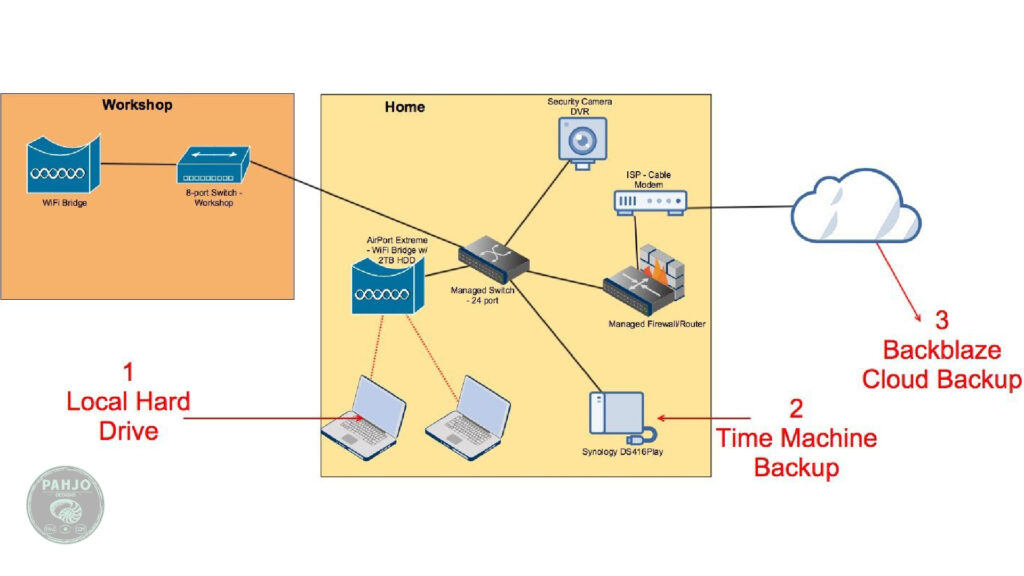
The addition of the new NAS box and Seagate 4TB IronWolf NAS drives (3) to my home data backup solution solves my main issues: Disk Space, Disk Redundancy, Access to Digital Media.
The Synology NAS is a network attached storage system that attaches to a home network via an Ethernet cable.
A NAS system contains one or more hard drives arranged in logical, redundant storage containers or RAID (Redundant Array of Independent Disks).
It is ideal for storing and sharing files across a network.
Additionally, Synology’s plex media server is the easiest way to share video files.
Unlike external hard drives attached to computers, some NAS units (like this one) have an operating system with apps that enhance it’s capabilities.
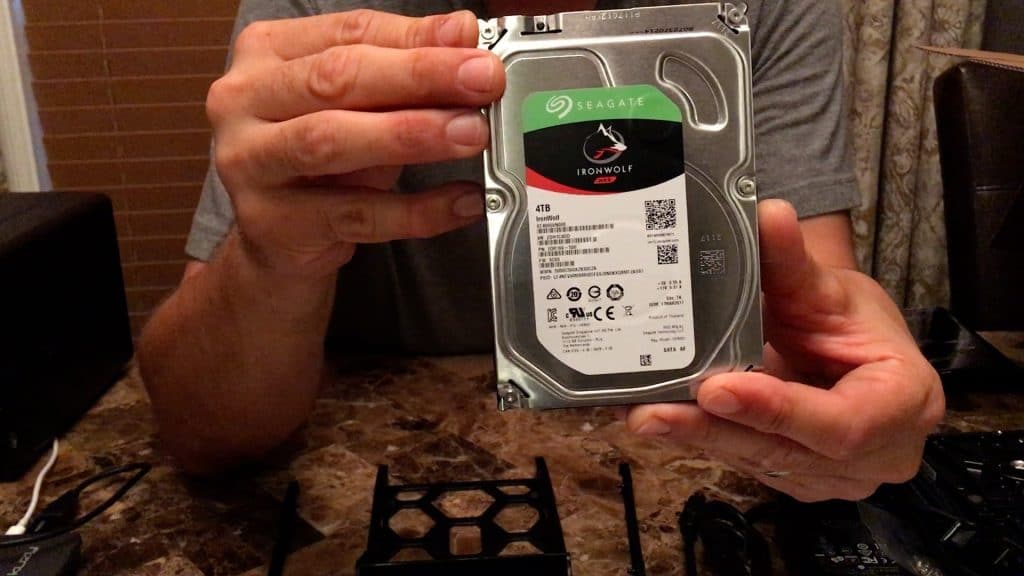
I populated the Synology with three Seagate 4TB IronWolf NAS 3.5″ Internal Hard Drives.
Synology Hybrid RAID (SHR) is the default redundancy mechanism for Synology.
SHR uses one hard drive as a backup which means the total storage for my system is 8TB.
One disk can completely fail and data won’t be lost.
8TB is a huge improvement over my current 2TB.
It accommodates the disk space needed for my time machine backups, independent external hard drive, and digital media.

Synology NAS Overview
Before I show you how to setup a home NAS, I’ll cover the features of the Synology NAS.
The Synology NAS is a versatile NAS (network attached storage) system with better performance and enhanced storage capacity.
I chose Synology over other NAS systems because of hard drive capacity, processor & network performance, and user friendly interface.
Also, the RAID configuration allows the standby hard drive to take over if a single active hard drive fails.
The Synology NAS has a dual-core processor, provides hardware data encryption, and dual LAN ports that can be configured for load balancing, failover and multiple IP addresses.
Synology states the server is capable of handling up to 256 concurrent file sharing connections.
In addition, synology has many media server options such as an iTunes server, Plex server, Logitech media server, and Synology’s Video Station Server.
I will cover the installation of the Video Station Server later in this post.
Home Media Server
The Synology DS NAS also is an excellent media server and network storage device..
It has the ability to transcode 4k video media files on the fly, which allows playback of your home movies on any device (Apple TV, DLNA devices, mobile, etc.).
The system has 4 physical drive bays for hot swappable hard drives.
Each drive can be up to 10TB and the system can hold up to 40TB without redundancy or 30TB with redundancy.
The Synology NAS processor performance numbers are impressive for a NAS system. Dual gigabit LAN offers failover support and service continuity.
Disk Station Manager (DSM) is the control center for the Synology NAS.
DSM is essentially the operating system of the NAS.
The DS923+ supports many apps to support a plethora of activities: backup, media management, file sharing, and much more.
Best NAS for Mac
Most NAS solutions on the market today support both Mac and Windows. Which NAS is the best for Windows? Which is the best NAS for Mac users?
My family uses apple computers and 1 old PC.
The Synology NAS solution is the best NAS for Mac computers in my opinion.
Synology is a bit more strict regarding app development and how much developers can tinker with the system.
The focus for Synology is stability and intuitive interfaces to streamline common tasks.
Synology behaves similar to MacOS; therefore, Mac users are attracted to this system organically.
There are many other reasons why Synology is the best NAS for Mac computers, but it is beyond the scope of this post.
Home NAS Installation
The Synology NAS and Seagate 4TB hard drives are very easy to install.
Synology did a fantastic job of streamlining the install process to accommodate home users without a technical background.
In turn, learning how to setup a home NAS is fairly easy.
Before proceeding with the installation, it is a good idea to configure the needed options first.
In other words, there are many nifty apps and configuration options that grab your attention.
Computer backup and media management were the most important items in my case, so I took care of these first by following the best practices laid out by the manufacturer.
Unboxing and Powering Up
My Synology DS416play and Seagate hard drives were very easy to assemble. The items were packaged very well.
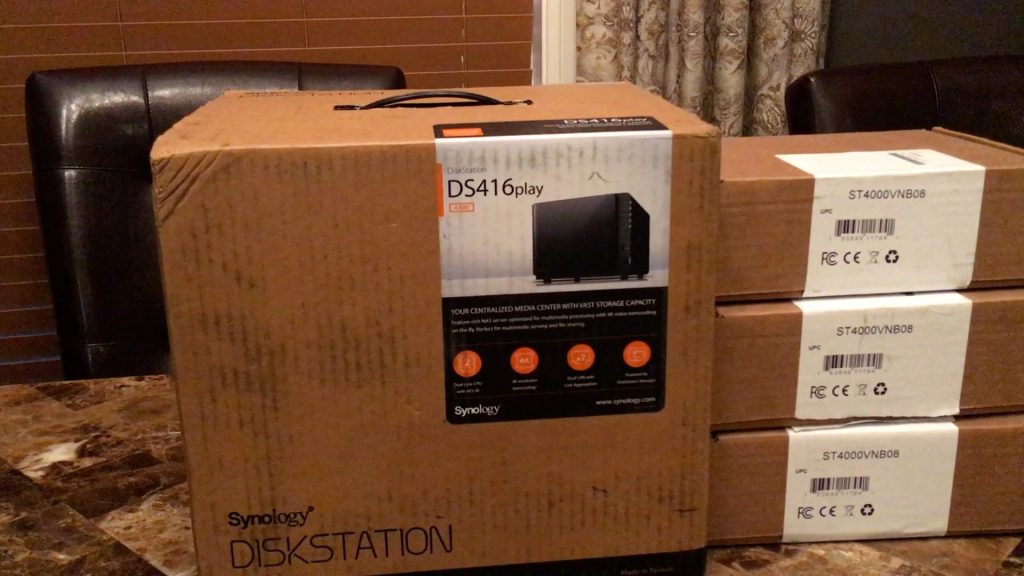


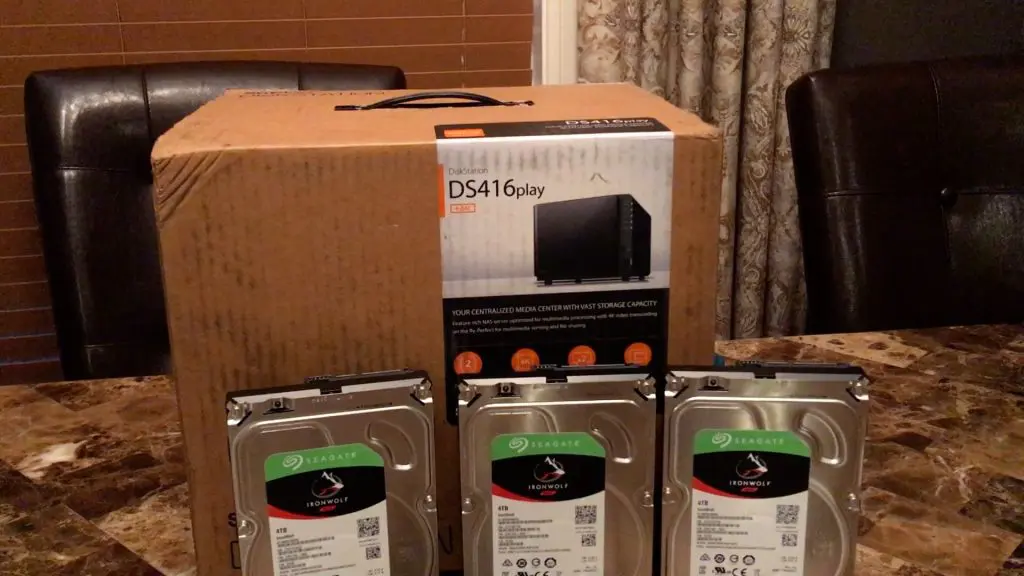
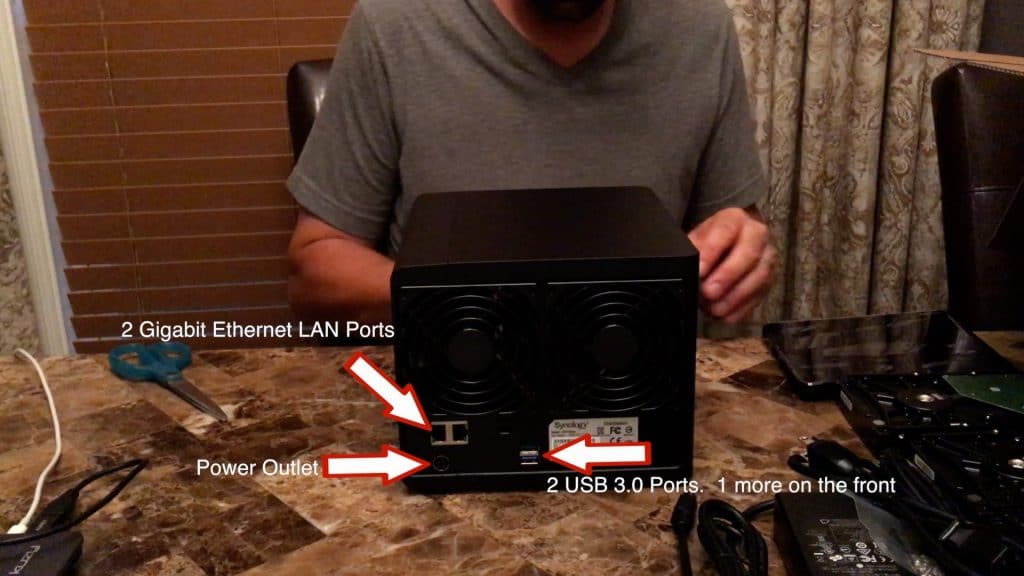
First, the Synology NAS has 2 gigabit ethernet ports, 2 USB ports, 2 fans, reset button, Kensington security lock, and a power port in the back.
Additionally, the front of the Synology DS416play has removable cover, 1 USB 3.0 port, power button, and 5 lights (status indicator light and a light for each hard drive).
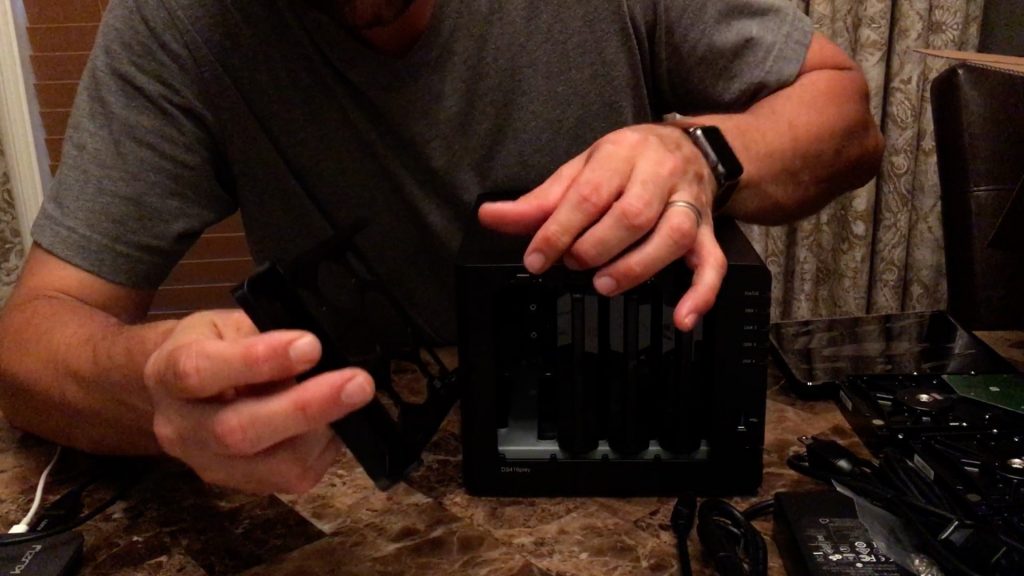
The rubber feet slide between the drive bays to hold it in place.
Also, the front panel fits snugly and it is easy to remove.
Behind the cover, each hard drive bay contains a removable plastic blank.
To remove the hard drive blanks, simply depress the top button and remove the blank.

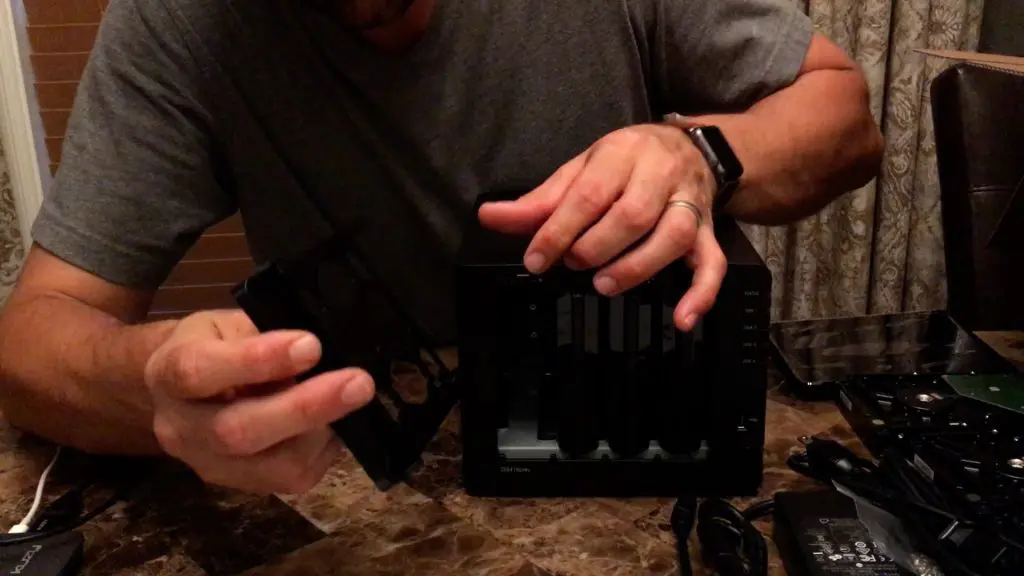
The hard drive blanks can fit 3.5″ hard drives (the type I purchased) without any screws or hardware.
However, screws are included if 2.5″ SSD drives are used.
So, simply remove the 2 side rails on the hard drive blanks, insert the drive, and re-attach the rails.

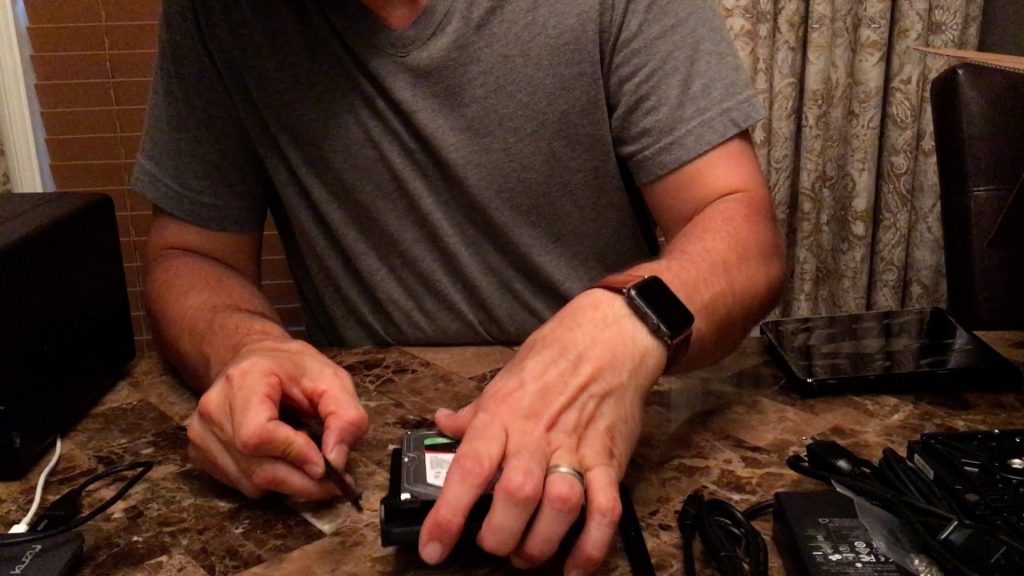

Once I installed each hard drive into the Synology DS416 play, my new home data backup solution installation was underway.
Next, I attached the home NAS to my network with 2 ethernet cables to my 24-port switch.
Then, I pressed the front power button and the Synology DS416play turned on.
Also, the boot sequence was fairly quick as the system obtained an IP address from my network and verified each of the 3 hard drives.
Initial Configuration
The next step in learning how to setup a home nas involves the initial configuration.
The initial configuration of the Synology NAS for my home data backup solution went smoothly.
Before I logged into the Disk Station Manager (DSM), I verified the 2 ethernet ports on my ethernet switch were active and forwarding traffic.
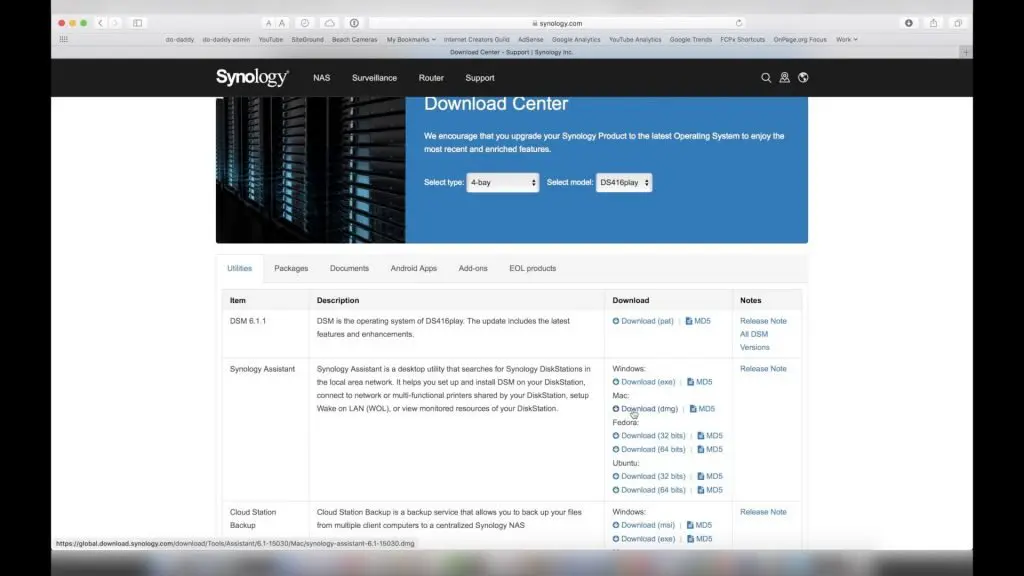
Next, I downloaded the Synology Assistant software for the Synology DS416play from Synology’s download center.
I selected they type of NAS, the model number, downloaded the software for my Mac, and installed it.

The Synology Assistant found my NAS on my network.
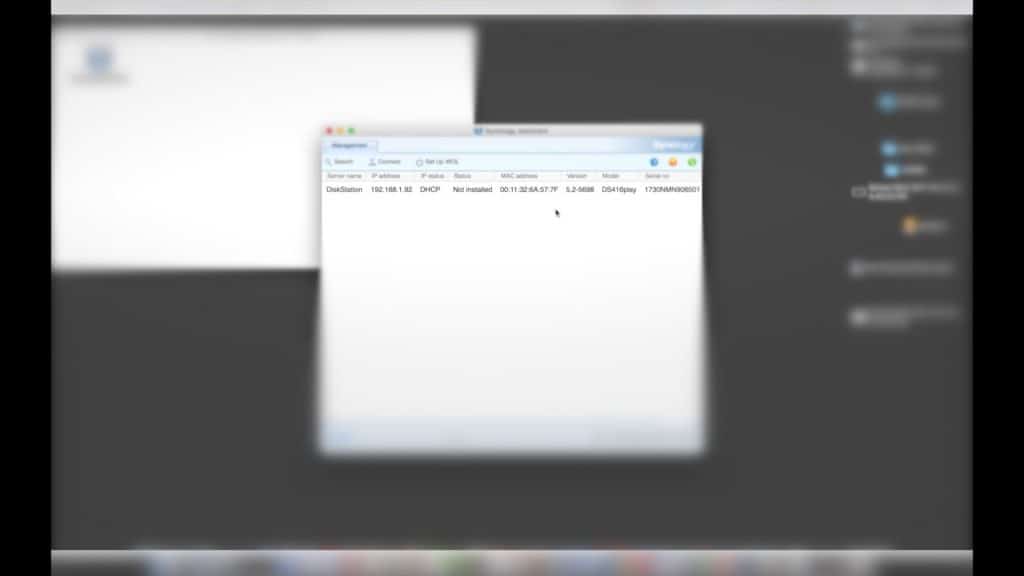
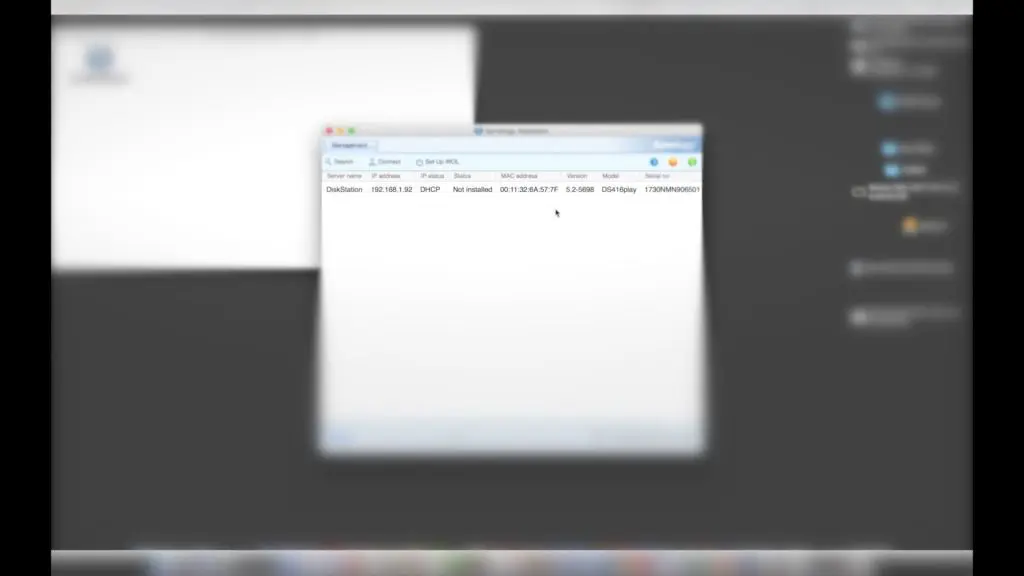
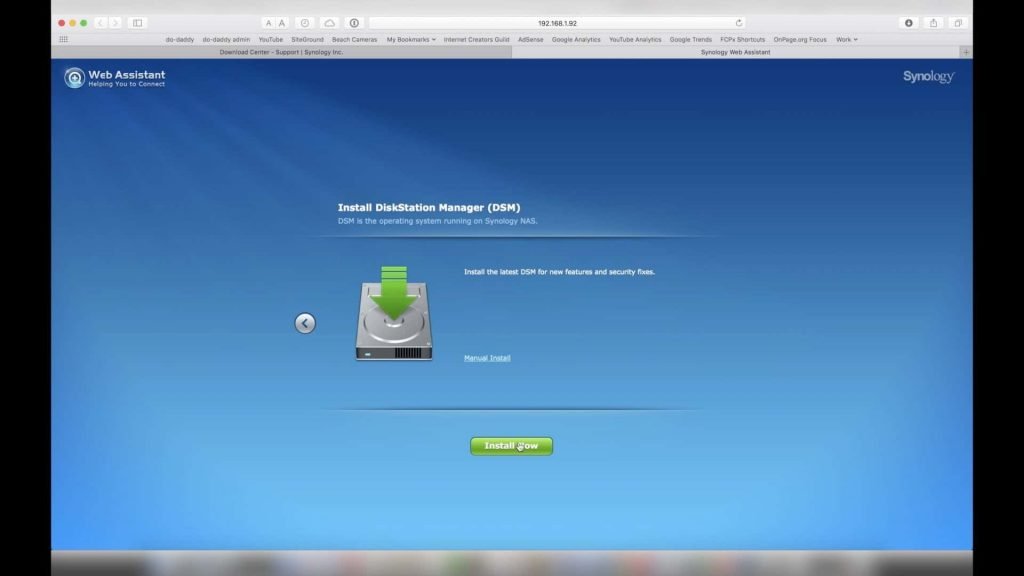
Next, I clicked on my NAS system and the Web Assistant setup wizard started.
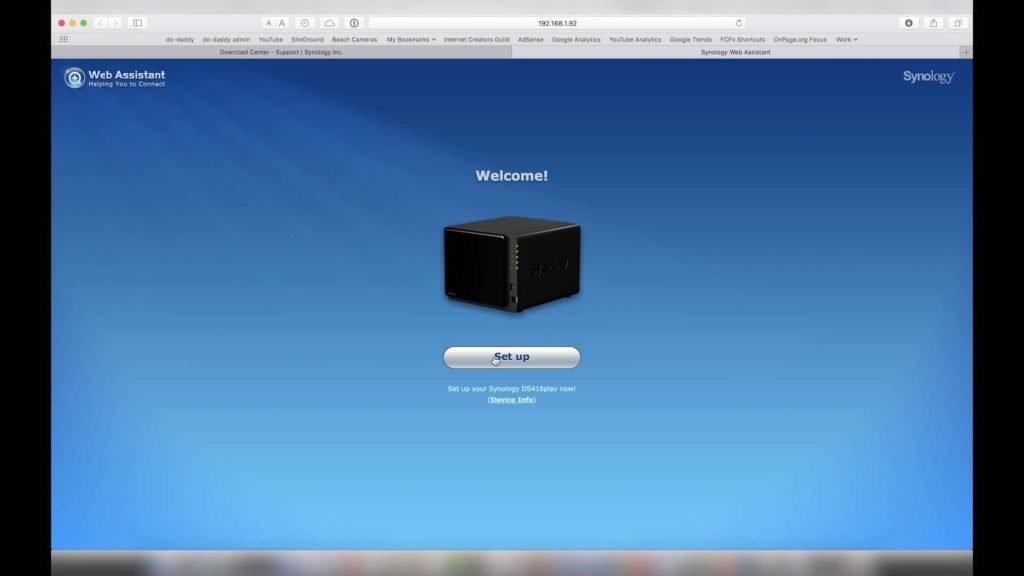
The Web Assistant prompted me to install DSM and I proceeded with the install.

Next, the 3 Seagate hard drives were formatted.
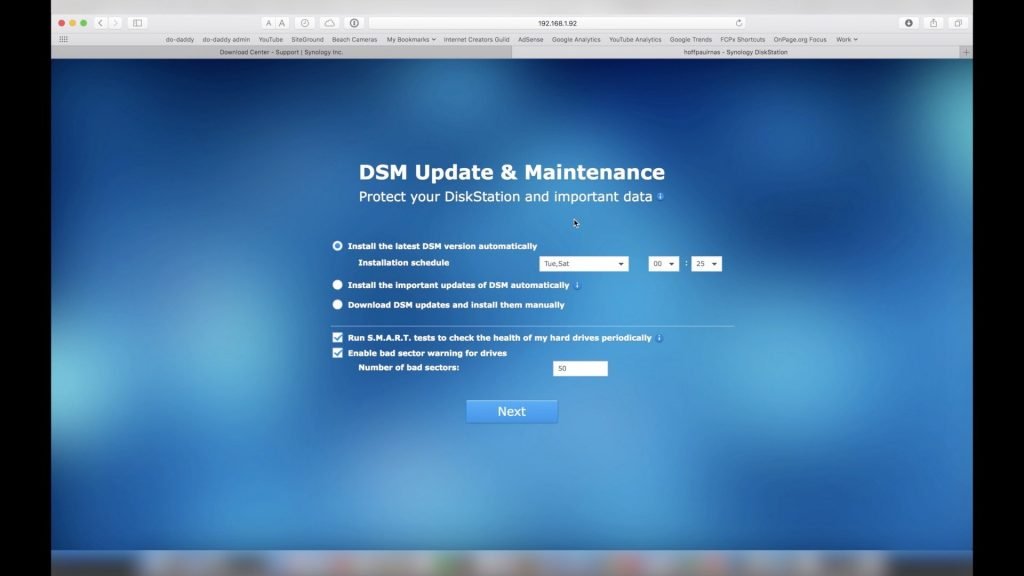
After the creating the administrator account, the setup wizard prompted me to automatically updated and maintain my system.
I kept the default options, which included day/time for DSM software updates, routine hard drive checks (S.M.A.R.T), and hard drive health warnings.

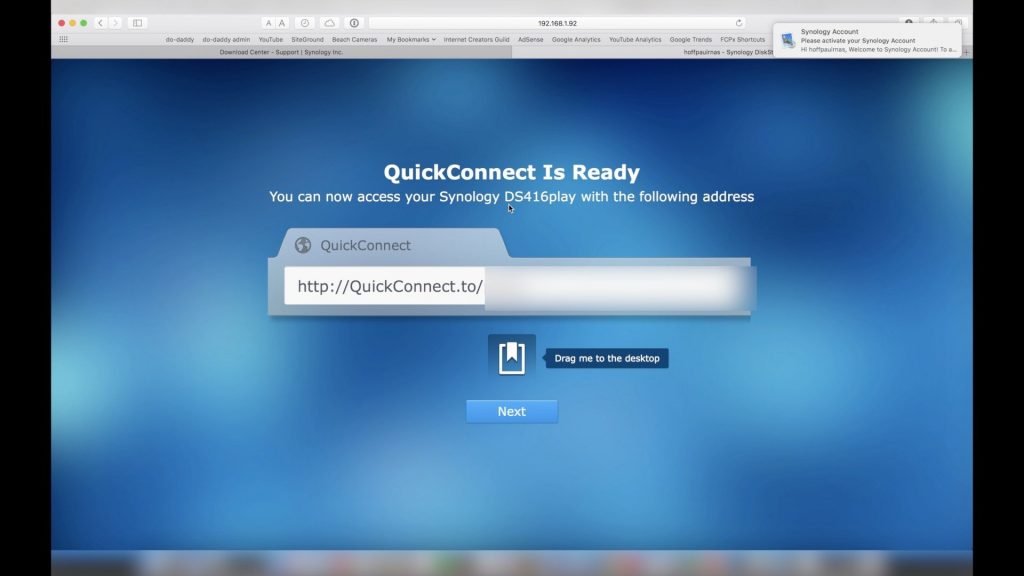
Next, I setup QuickConnect.
QuickConnect is a great feature because it connects the Synology DS416play NAS system to the Internet securely.
It also eliminates the need to setup port forwarding on a home router.
QuickConnect provides an easy to remember hostname in order to connect to your home NAS such as quickconnect.to/xyz.
Once I completed the QuickConnect setup, it prompted me to drag/drop the customized link to my desktop to streamline the login process.
DSM Upgrade
I used my admin credentials I created in the previous step to access DSM for the first time.
The user interface is very straightforward.
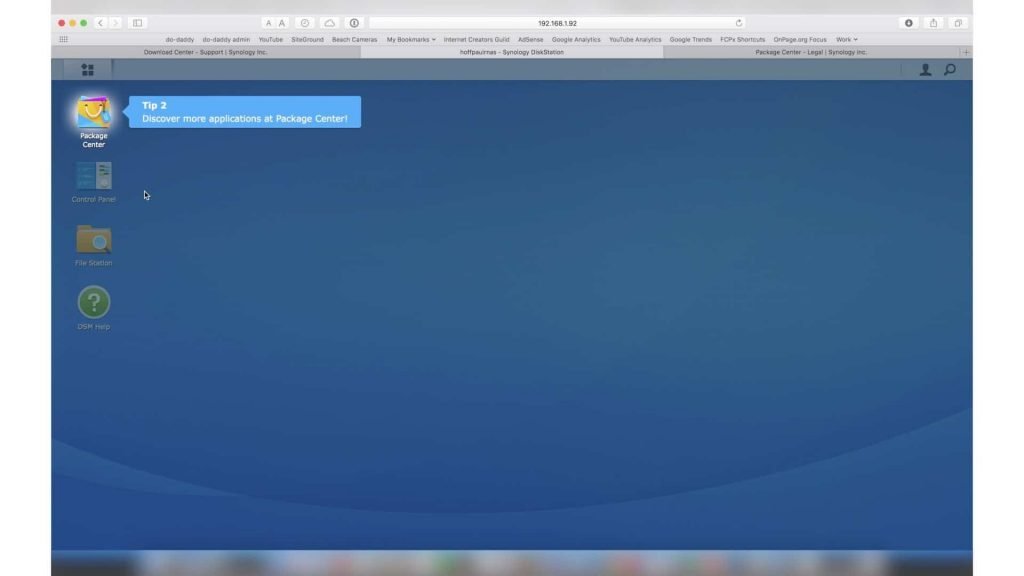

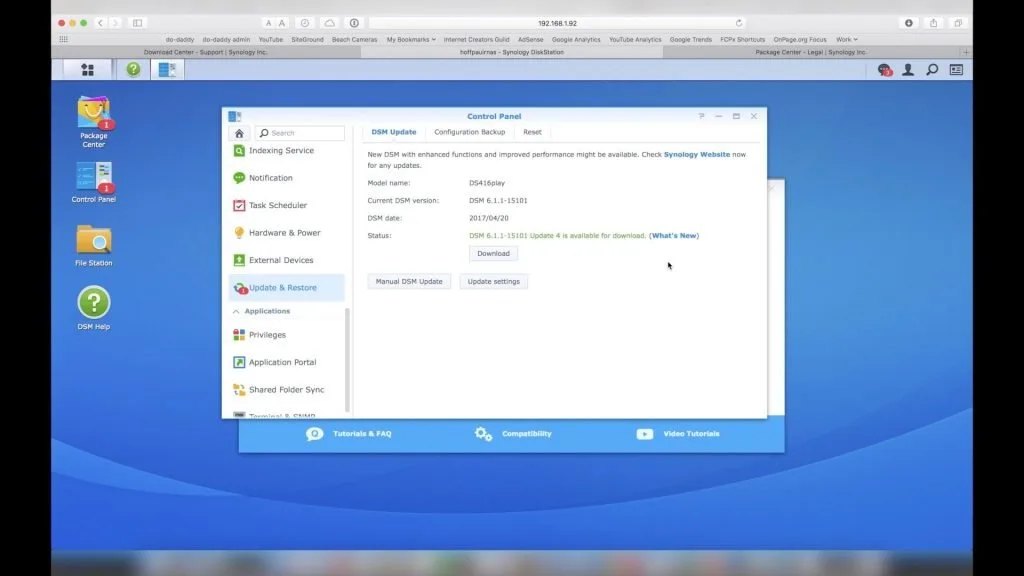
Next, I navigated to the Control Panel because it had a red notification next to the icon.
The same notification I receive on my iPhone apps.
I followed the red notification to the Update & Restore section where I updated DSM to the latest version of code.

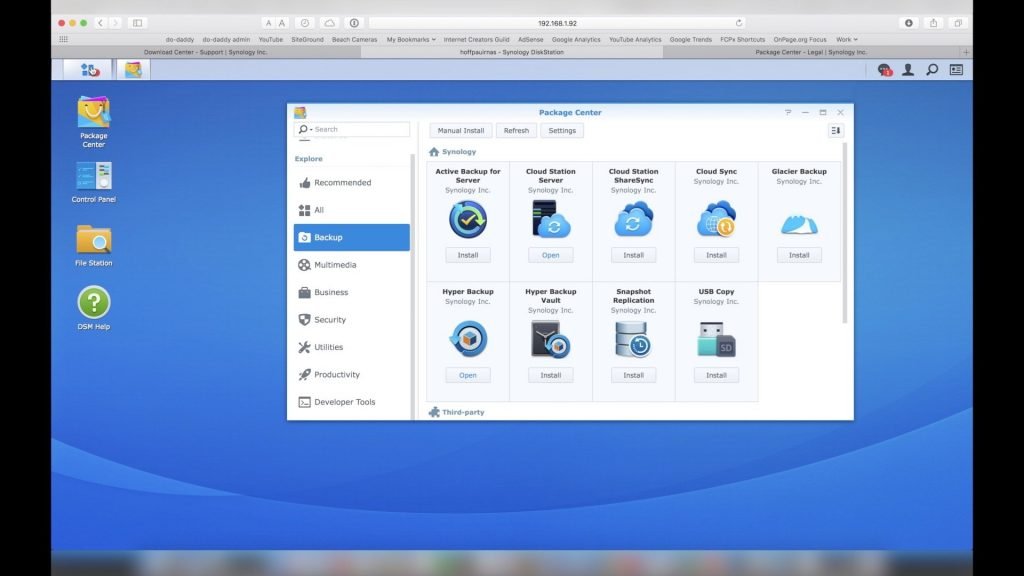
DSM Package Center
I navigated to the Package Center via the desktop icon and installed a few packages.
I mentioned earlier in this post the Synology DS416play has many apps & features which grab your attention.
This is the point in the setup process where it is easy to get distracted.
This happened to me and I started installing apps I thought I needed.
One hour passed and I realized I did not accomplish my 2 most important tasks: Setup Backups & Streamline Access to Digital Media.
The Package Center is similar to an App Store and there is no shortage of very cool apps.
The apps are organized into categories and a search box, which makes it easy to find applications.

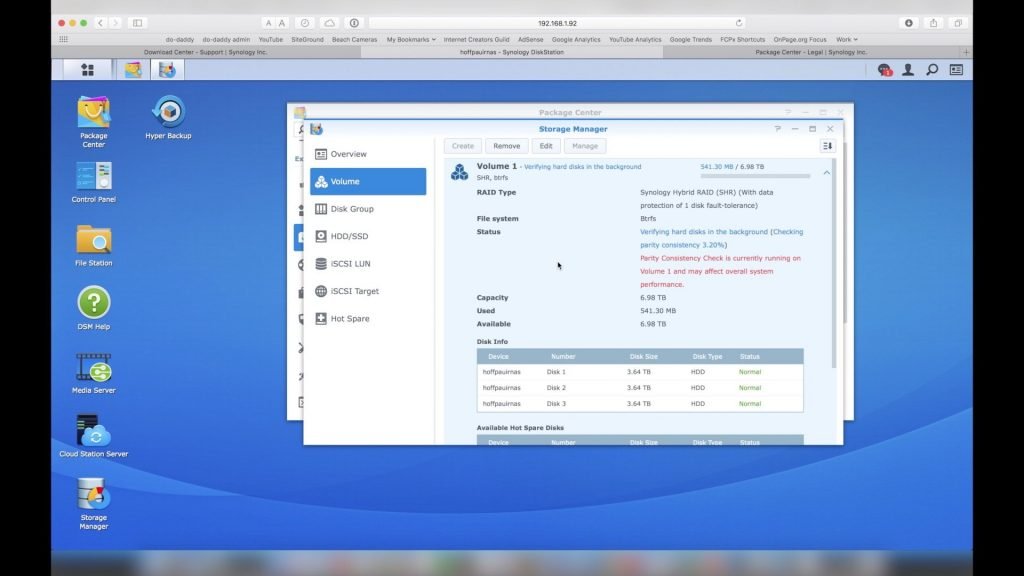
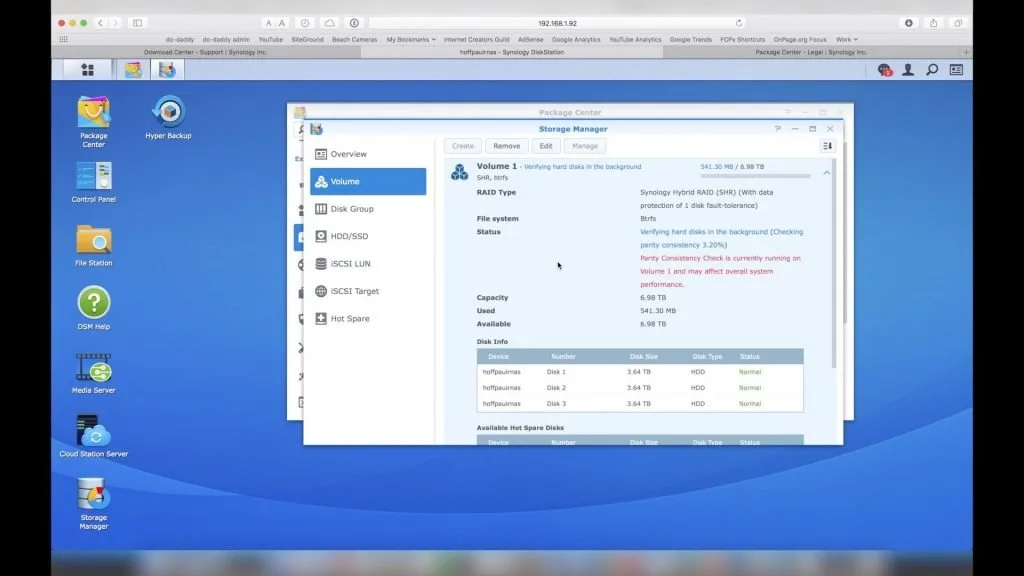
DSM Storage Manager
I navigated to Storage Manager via the Control Panel.
Once I accessed Storage Manager, I verified my 3 hard drives were healthy.
Also, I verified DSM was using SHR (Synology Hybrid RAID) for disk redundancy.
As I mentioned before, SHR uses one of my 3 disks for disk protection.
Consequently, I have a total of 8TB of available storage with hard drive protection.
If one drive fails, the backup drive will take over until I replace the failed drive.
Synology NAS Time Machine Backup
The main purpose for my Synology NAS is to backup my computers (including my 2TB external drive) using time machine.
My current home data backup solution works, but it has no disk redundancy.
Time Machine is the application that is used by Apple computers for continuous backups.
Time Machine runs in the background and continuously backs up my data to an external location.
I like using Time Machine because it is super easy transfer files to a new Mac or restore them to an existing Apple computer.
There are more than one way to setup Time Machine backups on the Synology DS416play.
Below are the steps I took that worked for me.
Time Machine Backup – Step by Step
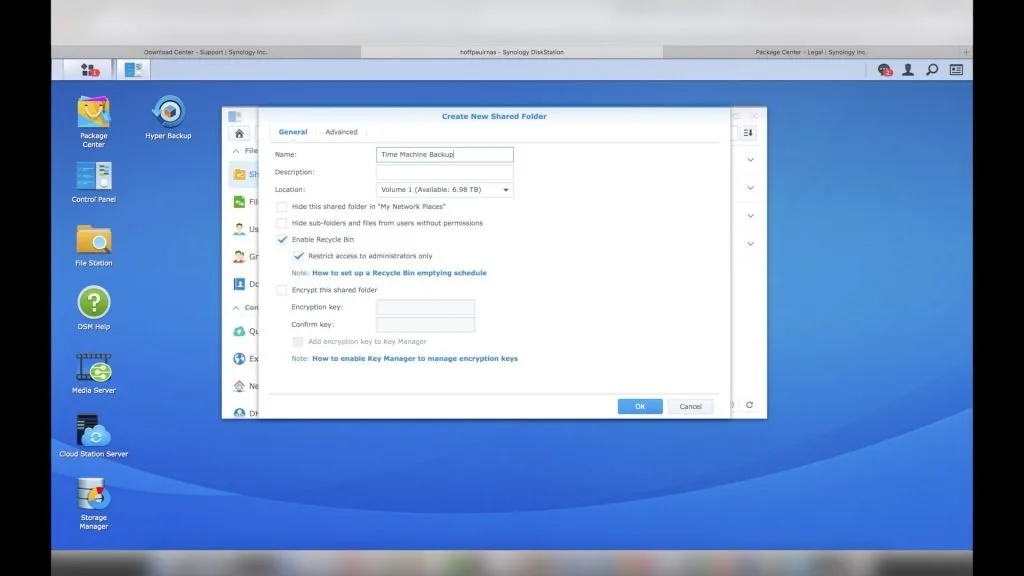
First, I created a shared folder for my Time Machine backup. Make sure to uncheck ‘Enable Recycle Bin’ as there is no reason to have a recycle bin in this folder.
I chose to encrypt my Time Machine backup on my MacBook Pro instead of having the Synology DS416play perform the encryption.
The hardware on my MacBook Pro is far superior than the processor/memory on the Synology DS416play, so it made sense to do it this way.

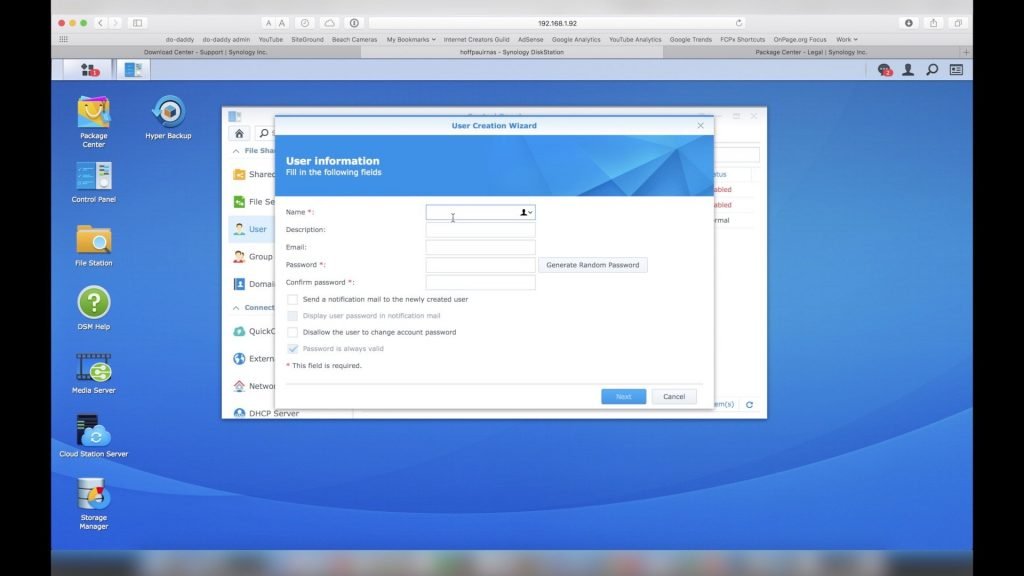
I navigated to the control panel then to ‘User’.
I created a new user account on my Synology NAS specifically for Time Machine backups.
Then, clicked ‘next’.
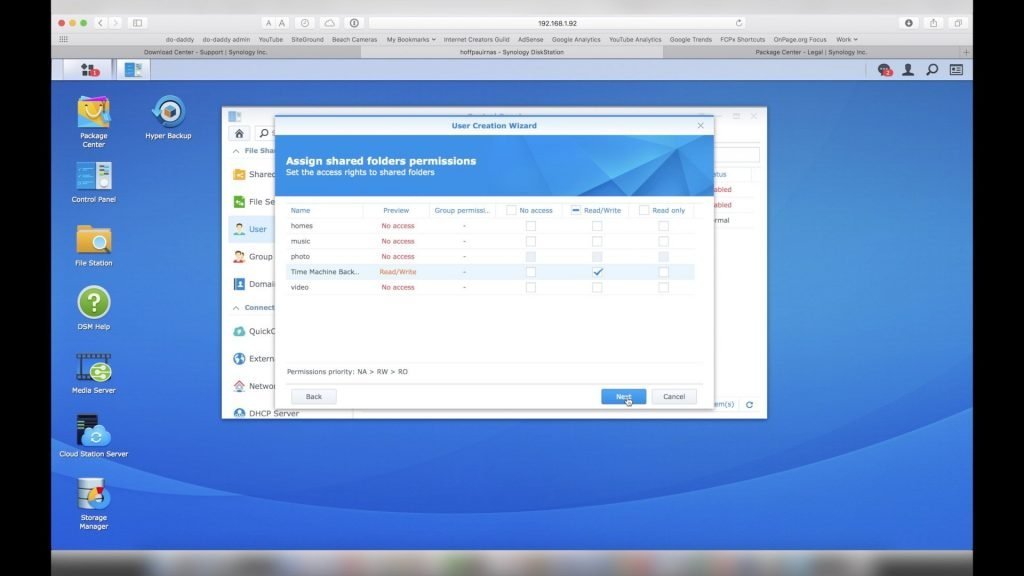
Next, I assigned the user account to the user group.


On the next screen, I assigned Read/Write privileges to the Time Machine Backup folder I created earlier.
This user does not need access to any other folder.
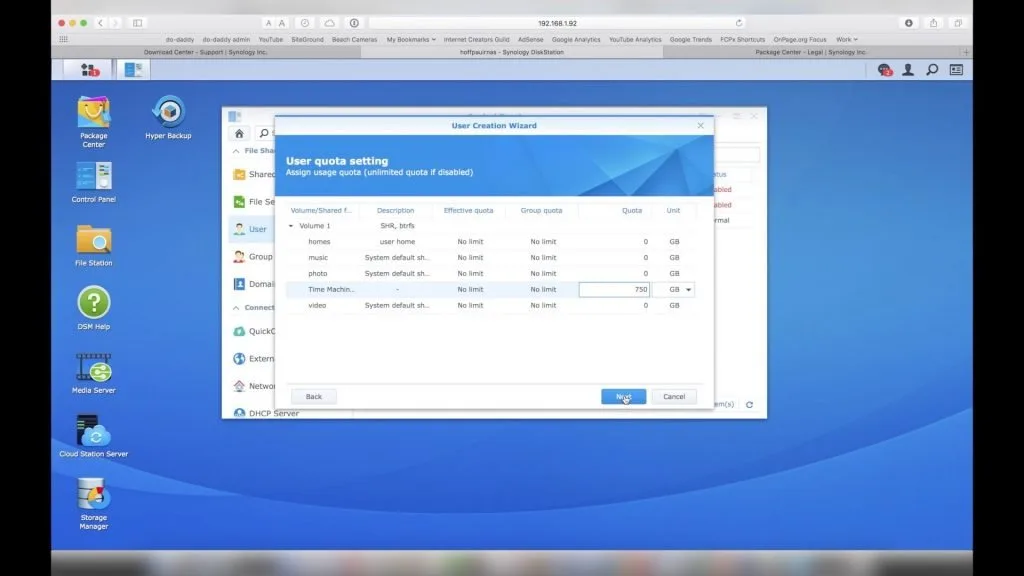
Then, I set a quota to 3 times the size of my hard drive.
My computer’s hard drive is 250gb, so 250 x 3 = 750gb.
The increased size allows Time Machine to keep multiple copies of my data instead of just 1.
This prevents me from restoring a corrupt backup.
I actually went back into this setting and increased the size quota from 750gb to 4TB to accommodate my external hard drive.
Ultimately, a user quota is needed to prevent Time Machine from consuming all the available space.

Time Machine Protocol Options
Time Machine uses a protocol to backup data to an external location.
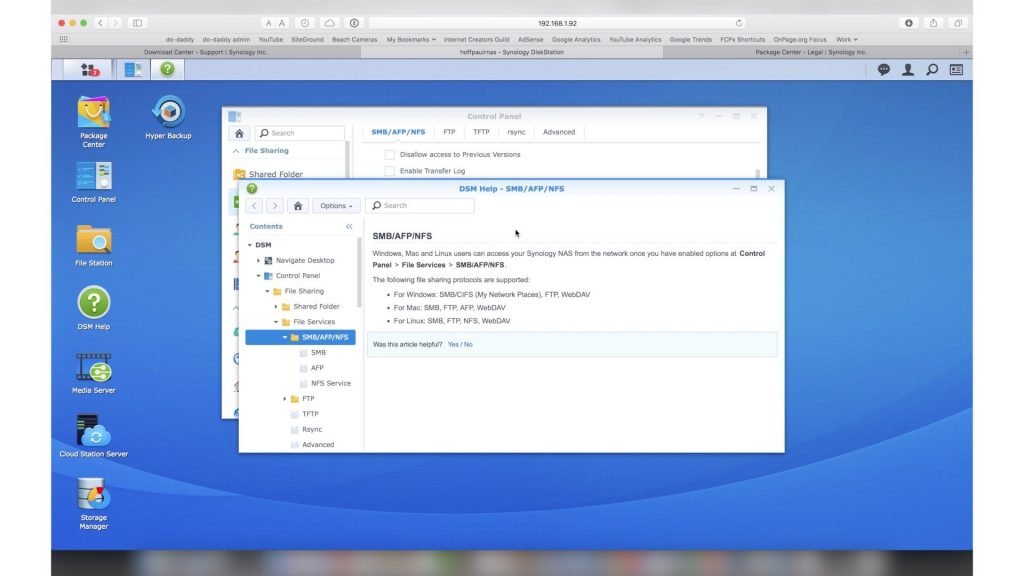
There are 3 protocol options in the Synology DS416play: AFP (Apple Filing Protocol), SMB (Microsoft’s Server Messaging Protocol, NFS (For Unix Systems).
The technical details of these protocols are beyond the scope of this post.
The most important thing to remember is the native client always is best even though some support other systems.
I recommend to use AFP for Apple, SMB for Microsoft, & NFS for Linux/Unix systems.
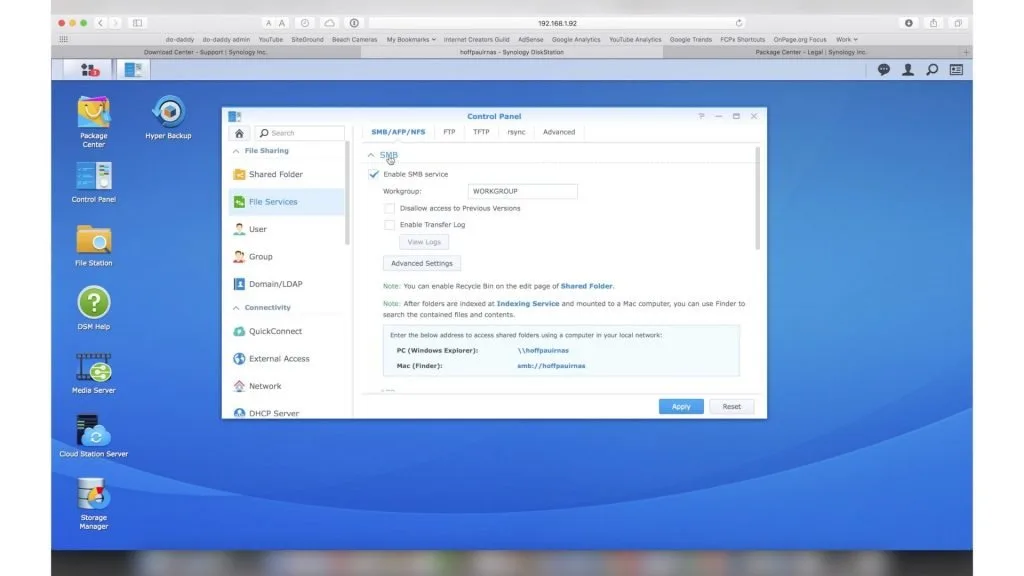
I opened the Control Panel and went to File Services.
Then, I enabled AFP by checking the box.
Next, I clicked on ‘Advanced Settings’ and checked the box labeled ‘Release Resources Immediately After Disconnect’.
This will prevent my computer from hanging at the end of a backup (the error is ‘waiting to complete first backup’.
Follow the link to “Enable to Bonjour service discovery at Service Directory” then check the boxes “Enable Bonjour service discovery” and “Enable Bonjour Time Machine broadcast via AFP”.


My final step was to configure Time Machine to begin using my new home data backup solution on the Synology DS416play.
I opened Time Machine in my menu bar or Preferences then clicked ‘Select Disk’.
Next, I selected the DSM share folder I created earlier. I checked ‘Encrypt Backups’ since I want my MacBook to do the encryption. I then saved my settings.
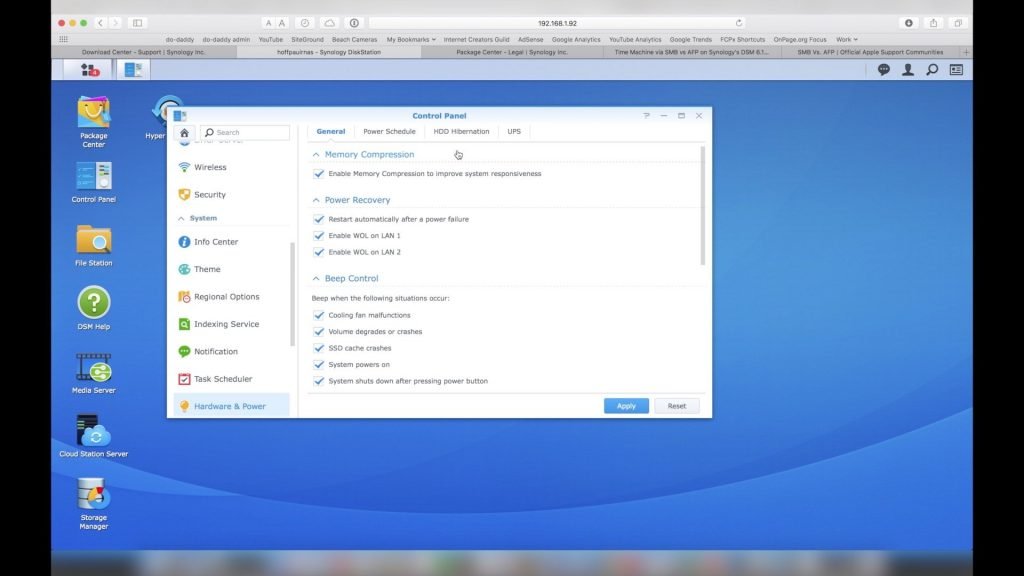
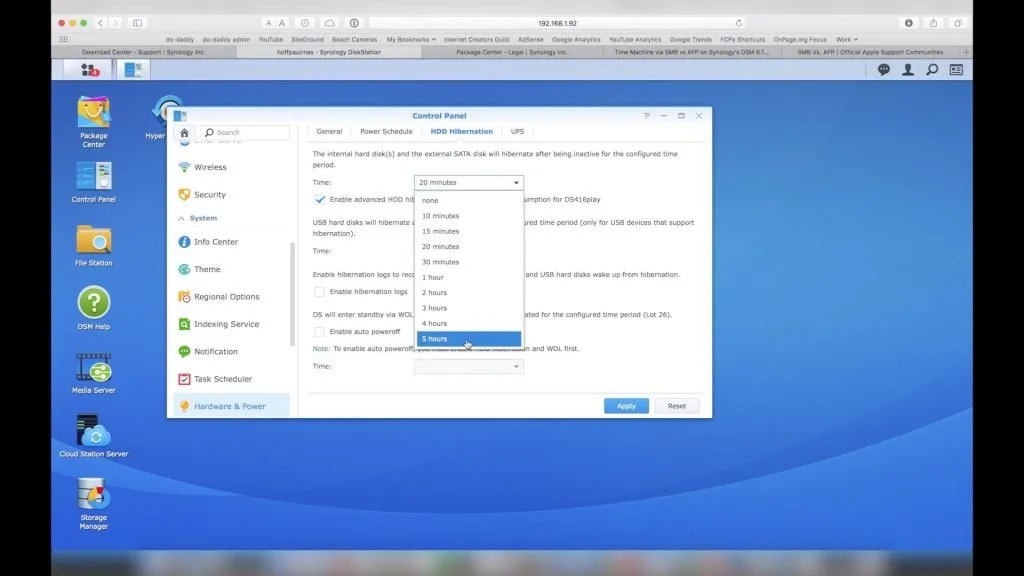
Hardware and Power Settings
I moved on to configuring the Hardware and Power Settings of my Synology DS416NAS for my home data backup solution.
I opened the ‘Control Panel’ and clicked on ‘Hardware and Power’.
Under the ‘General’ tab, I chose ‘Cool Mode’.
This was the best choice for me because the noise from the Synology DS416play’s fans was not an issue.
Additionally, the fans aren’t loud to begin with.
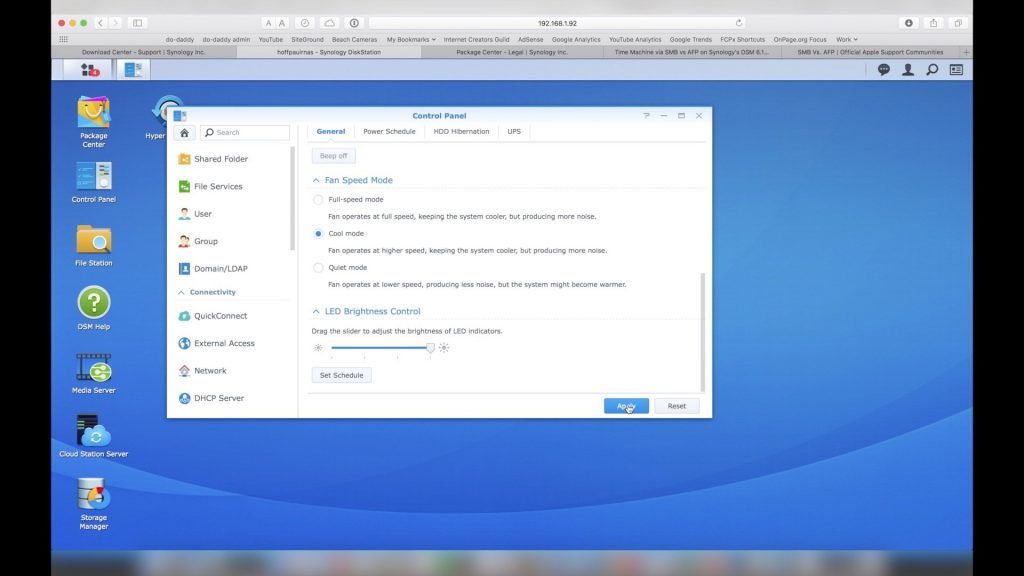

Next, I configured the settings as listed in the screenshot below, which are also under the ‘General Tab’.
My 24 port switch supports WOL (Wake On LAN) and I want the system to restart automatically after a power failure.
I configured the hibernation period to be 5 hours.
I did this because I work from home and plan to access this system quite often.

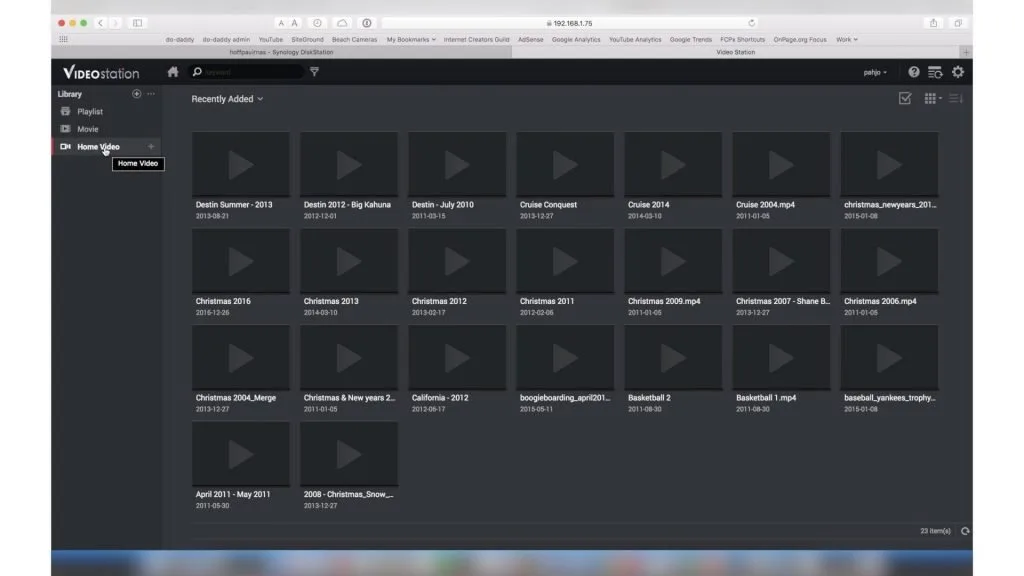
Video Station Manager
As I mentioned previously, the ability to access my media library easily is a priority.
I installed the Video Station Manager from the Package Center on my Synology NAS.
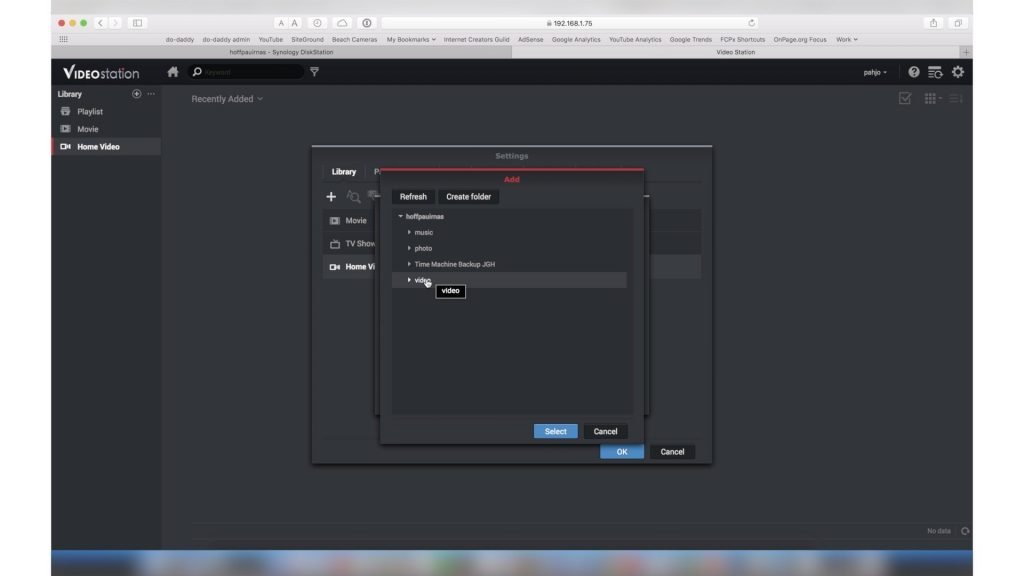
The Video Station application automatically created a folder called ‘video’.
This is where I uploaded all of my home movies.
When I finished uploading all of my home movies, I opened Video Station by clicking on the app from the Synology desktop.
I clicked on ‘Home Videos’.
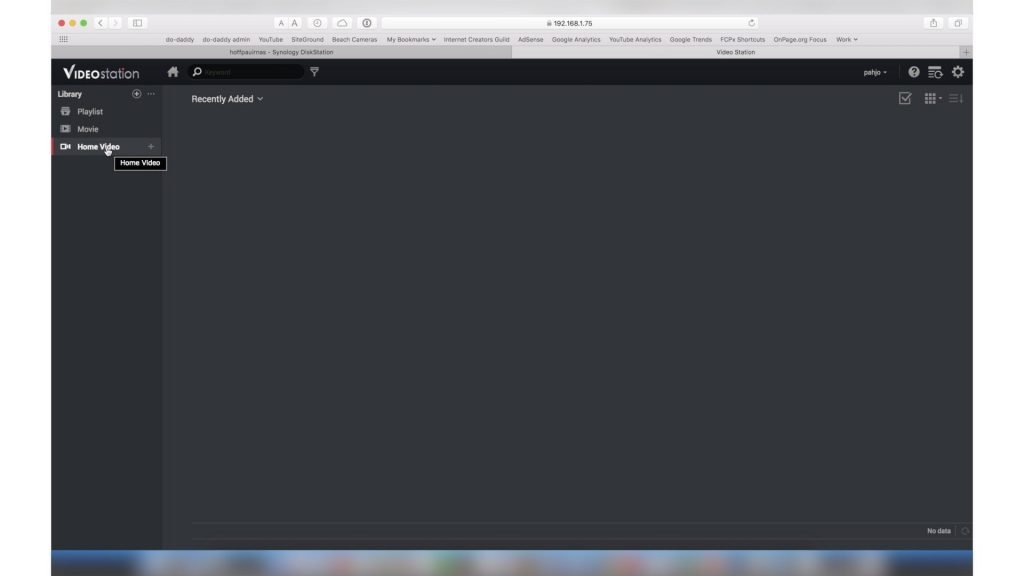
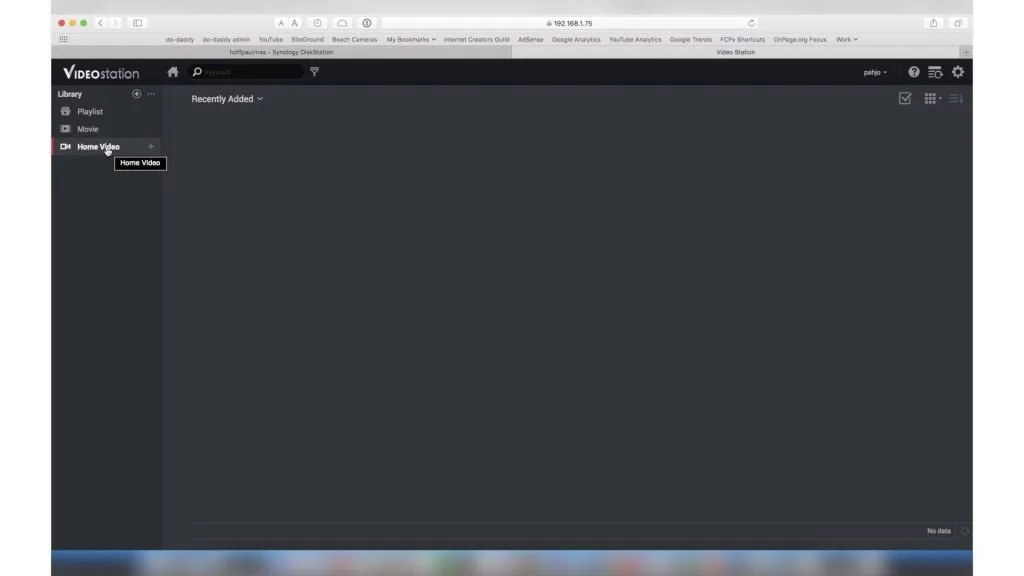
The ‘Settings’ window appeared and I chose ‘Home Movies’.
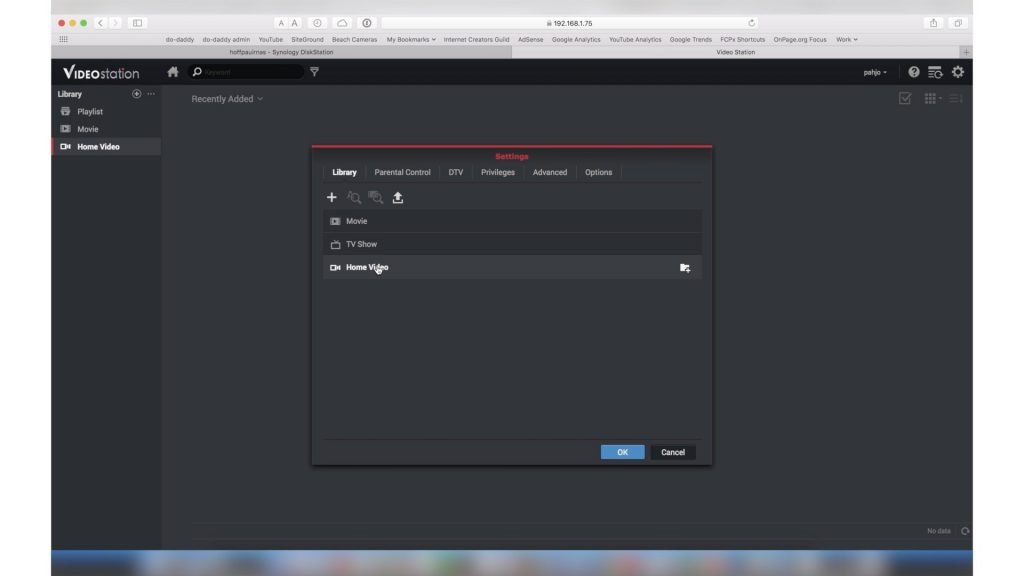
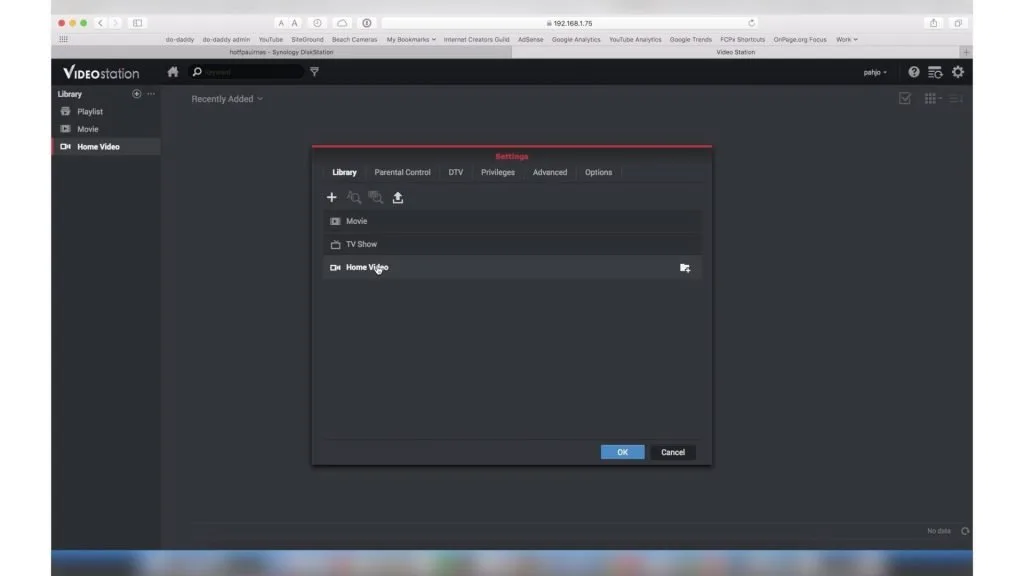
Next, I clicked the ‘Select’ button to inform Video Station where my home movies were stored.
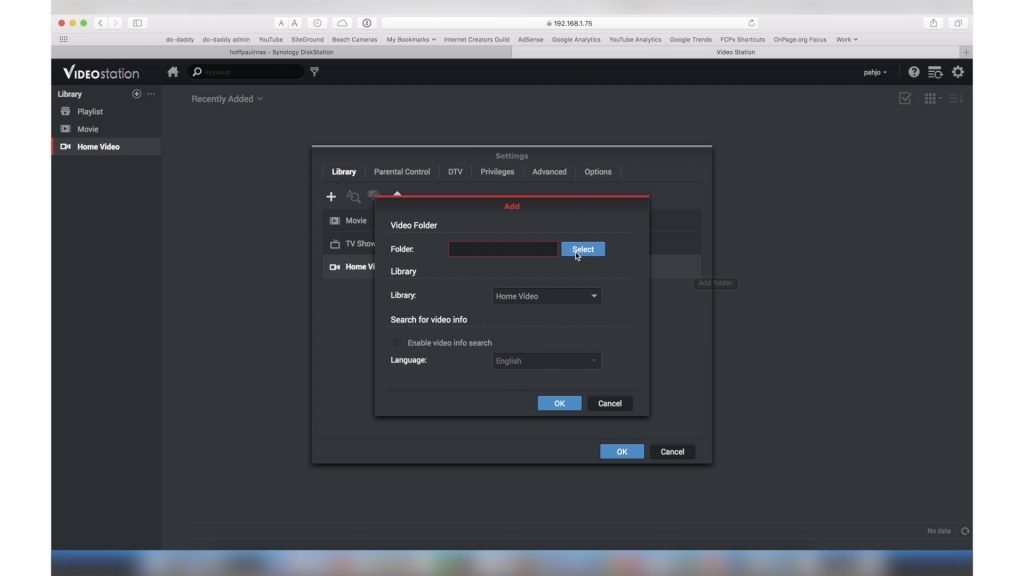
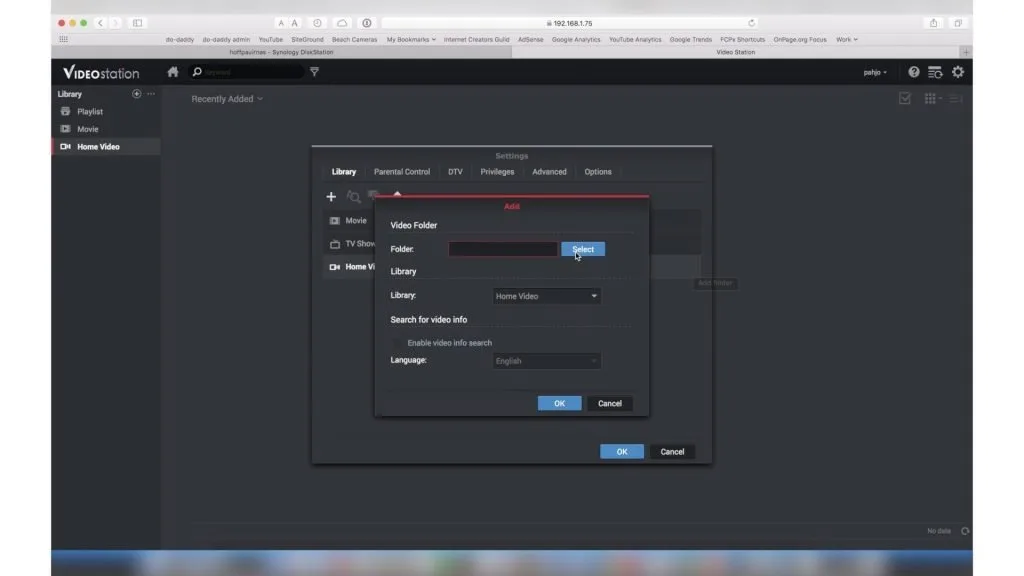
I selected the ‘video’ folder.
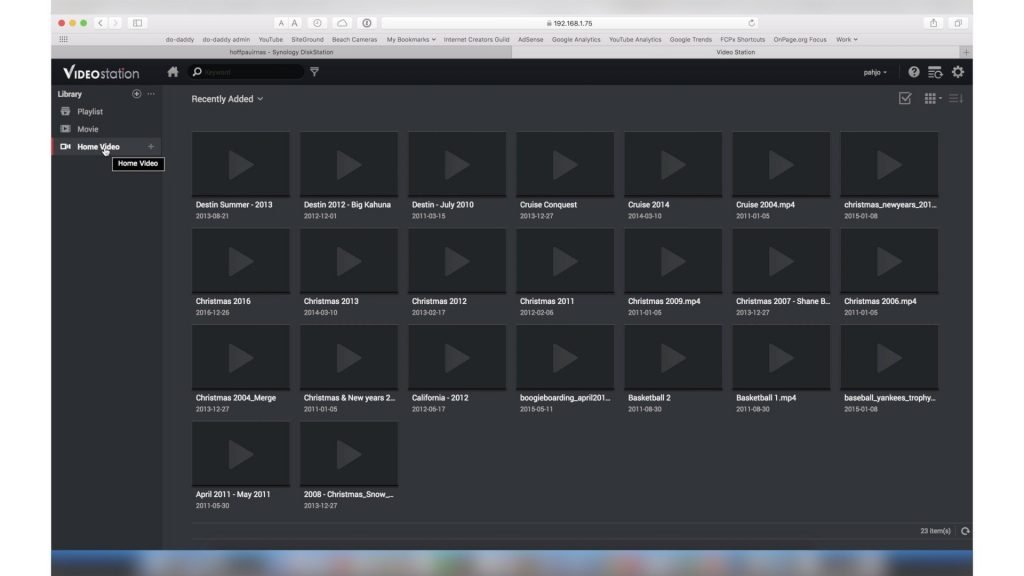
My home movies began to populate into Video Station.
My full library was populated within minutes and ready for streaming.
This allows me to stream my movies to and streaming device (Apple TV, Amazon Firestick, etc.) or any DLNA compatible TV within my home.
However, I need to remember to manually upload my movies each time I add one to my library.
I’m certain there is a way to setup a shared folder to have them sync to my Synology NAS and mirror to the video folder, but I haven’t got around to doing that as of yet.
Conclusion
Ultimately, I am super happy with my new home data backup solution using the Synology NAS.
As I mentioned, I researched many home NAS systems on the market and none matched the features, performance, and the price of Synology.
In addition, my NAS system has been up and running for 3 weeks and I am very happy.
Most importantly, I hope this project provided you with some value.
Related Articles:
How To Quickly Resize Images on a MAC
Automate Dust Collection System
Best Home Generator for Power Outages