
In this epoxy table tutorial, learn how to build a DIY live edge epoxy river bar top table for an outdoor kitchen. Also, I show you many useful epoxy tips and woodworking techniques.
In this step by step tutorial, I reveal professional tips on how to make a unique epoxy resin table.
At the end of this article, I have a FREE resin calculator you can download.
- Mix Epoxy Resin with Pigment and Glow Powder
- Suspend and Embed rocks in epoxy river table
- Sand Epoxy Wood Surfaces
- Finish an Outdoor Table
Best Epoxy Resin To Use
Selecting the best epoxy resin for your project is very important to produce favorable results.
For this live edge river table, I used a deep pour epoxy for the river.
Next, I used a table top epoxy to top off the resin river.
Then, I used a penetrating epoxy to prepare the wood for the outdoor varnish.
Don’t worry, I’ll explain these in greater detail later in this tutorial.
Epoxy Casting Resin

The best casting epoxy resin for a thick epoxy pour is Super Clear Liquid Glass.
Ultimately, I prefer Liquid Glass because:
- It produces a crystal clear finish with minimal bubbles.
- Deep pours of 2” to 4” or more.
- High Grade UV resistance.
- It’s 100% made in the old U.S.A.
Best Epoxy Resin for Wood

My favorite epoxy resin for wood is TotalBoat Table Top Epoxy for the following reasons:
- It is easy to use and very forgiving.
- Resists scratches and extremely durable.
- Used for a wide variety of projects.
- 100% Made in the USA
Favorite Epoxy Resin to Seal Wood

First, I want to include TotalBoat Penetrating Epoxy in my list of the best epoxy resin to use for epoxy river tables.
I use penetrating epoxy to seal wood surfaces before applying an epoxy resin top coat or varnish.
Penetrating epoxy provides many benefits such as:
- Wood hardener for rotted wood.
- Penetrating wood sealer to protect against mold, mildew, moister, and fungus.
- This marine-grade epoxy resin is very thin, which allows it to penetrate deep into wood fibers and seal cracks and crevices.
Other Epoxy Supplies
Tuck TapeHeat Gun
Best Deep Pour Epoxy
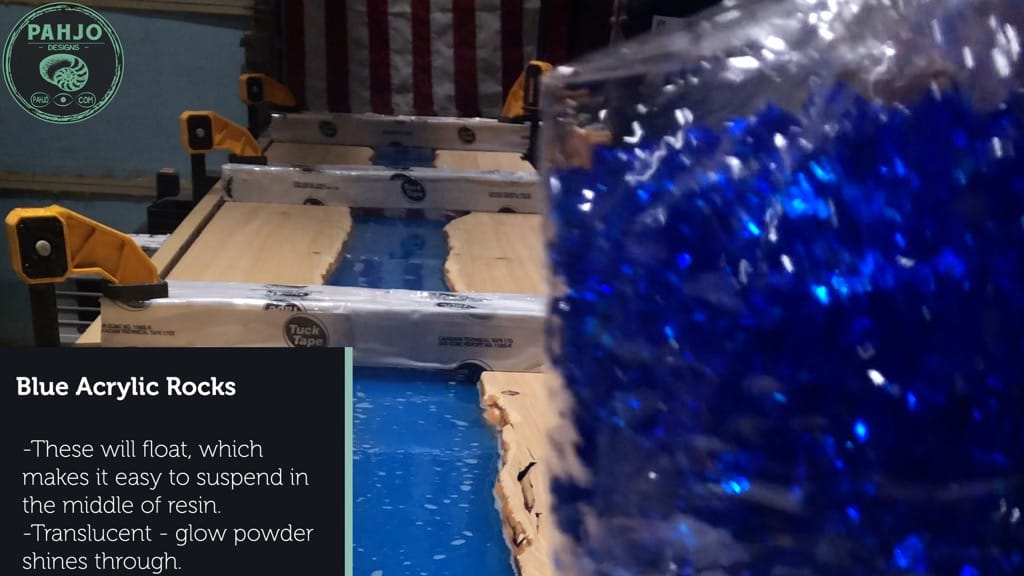
Acrylic Rocks
5 Gallon Buckets
Drill Paddle Mixer
Blue Pigment Powder
Fluroscent Blue Glow Powder
Table Top Epoxy
Penetrating Epoxy
Small Mixing Containers
Card Spreader
Halcyon Clear Gloss Varnish
Synthetic Brush
Tools Needed for Live Edge Epoxy River Top
Festool Track SawTrack for Saw
Saw Horses
Festool RO125 Sander
Soft Sanding Pad
Sandpaper
Air Compressor
Angle Grinder
Shaping Disc
Pocket Hole Jig
DIY Epoxy River Bar Top Video Tutorial
There are several things which are difficult to fully explain with words and images, so be sure to check out the video tutorial below.
How To Prepare Live Edge Wood Slab
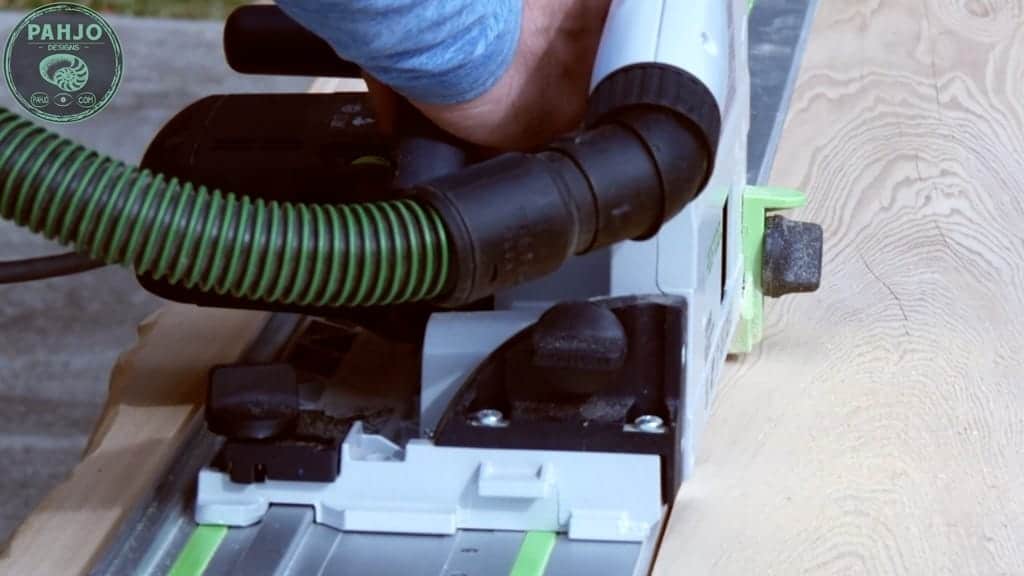
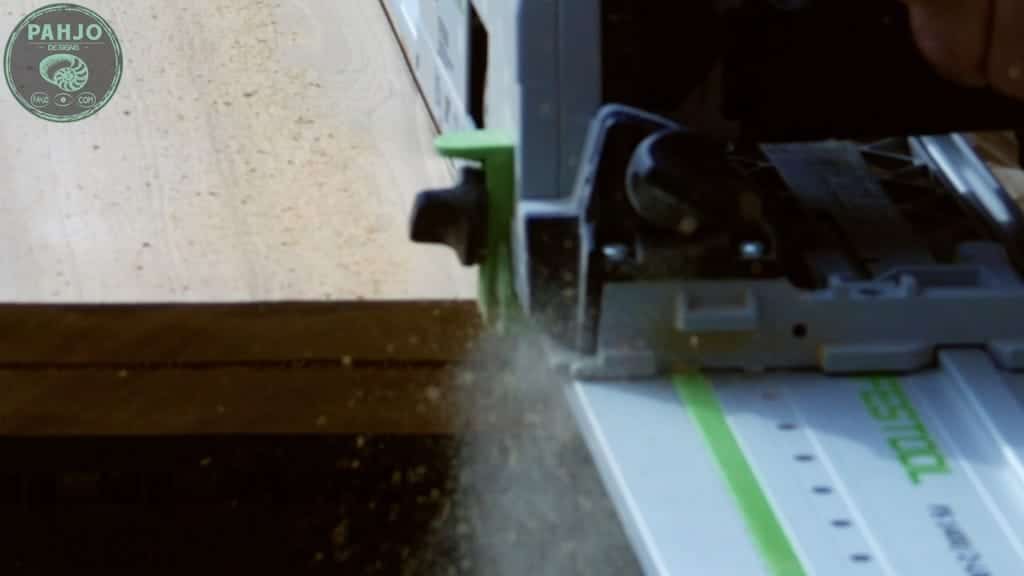
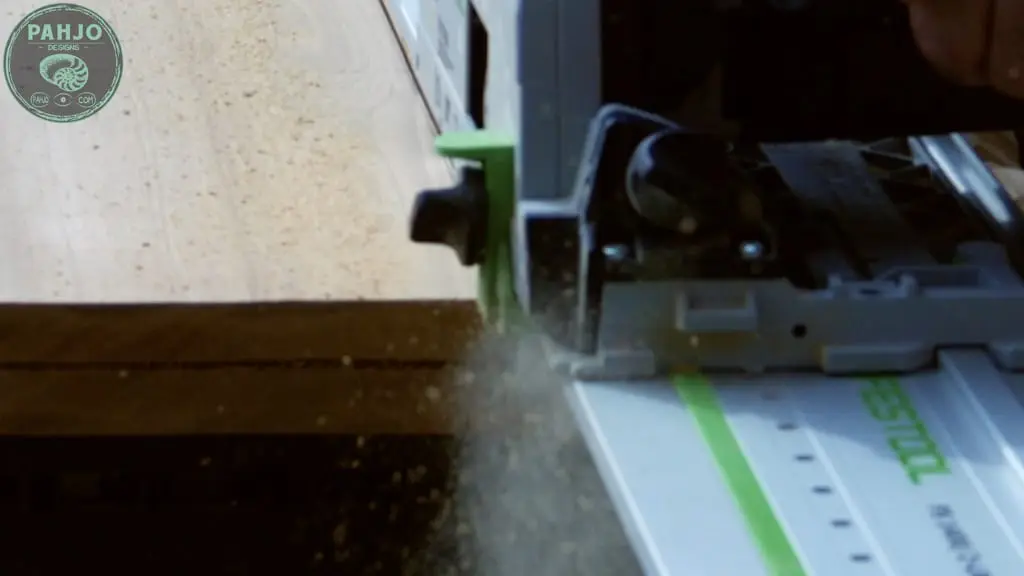
First, I used my track saw to cut the live edge wood slab directly in half.
Even though it was painful to cut the slab, I did not have a choice.
My customer requested a live edge facing his outdoor kitchen, a live edge facing the pool, and 2 live edges for the river.
As a result, I needed to make an artificial live edge facing the river.

Live Edge Wood
First, I needed to clean up the live edge wood.
Often times, live edge wood slabs contain sharp edges and embedded debris.
This must be removed to allow the epoxy to soak into the wood.


Essentially, I used my grinder with a kutzall sanding disc to smooth the natural live edge wood slab.
This took some time, but it was not a difficult process.


Epoxy Mold Tips
I notice many folks using melamine to build an epoxy resin table top mold.
While melamine works well, it is a bit expensive.
To reduce costs, I use plywood covered with Tuck Tape for most of my epoxy table molds.
I used 1 sheets of 3/4” plywood to create the mold for this epoxy live edge bar top table.
First, I ripped the plywood to 20” wide and 8’ long.
The width is 2” wider than the live edge wood slab.
Then, I used pocket holes to join 2 8’ pieces of plywood at each end. This made the the plywood 16 feet long and 20” wide.
Even though 3/4” plywood is sturdy, the epoxy mold should be supported at each end and in the middle to prevent bowing.
I trimmed off 1.5’ feet from each end and used these pieces at each end of the epoxy river.
This left me with 6” at each end of the epoxy bar top.
Also, I chose to not close in the mold on the sides b/c I don’t think it’s necessary.
Finally, I covered the plywood with tuck tape.
Tuck tape is sheathing tape, which releases epoxy easily.
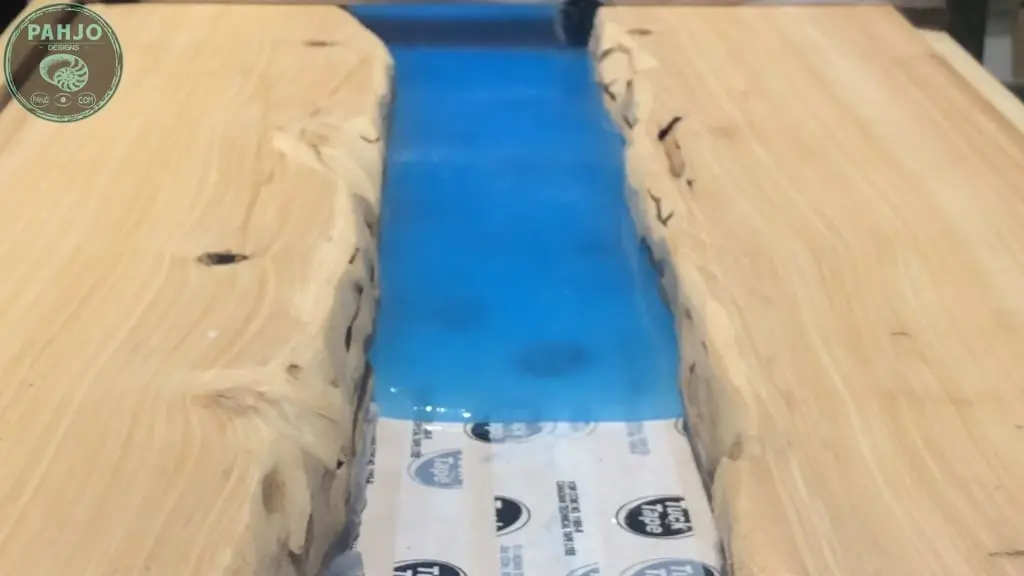
Place Live Edge Wood in Resin Mold
After I applied the tuck tape, I laid each piece of wood in the resin mold and positioned them correctly.
Next, I used silicone to seal the bottom of the live edge to prevent epoxy from leaking under the table.
I let this dry for a few hours
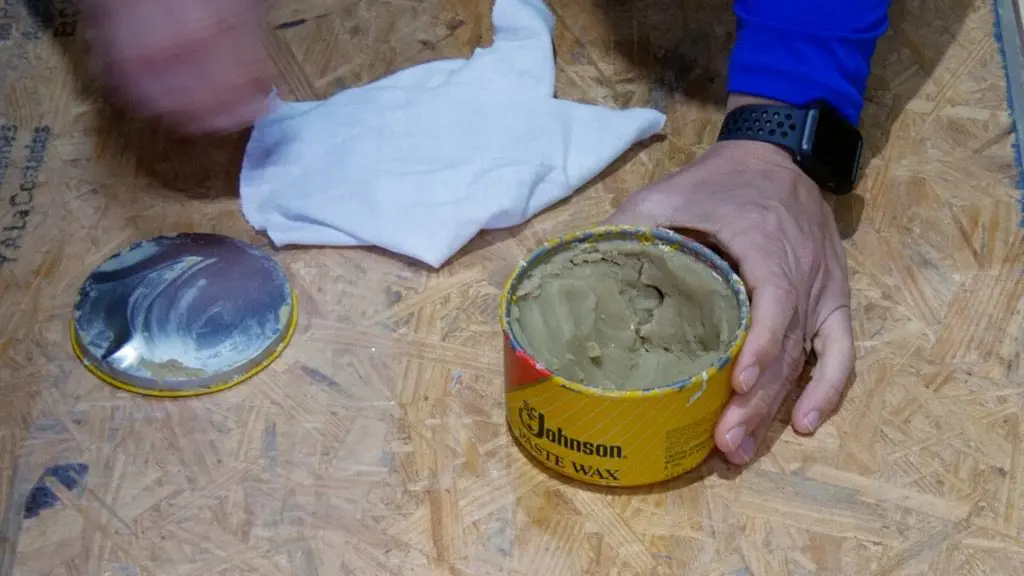
Resin Mold Release Agent
Apply a thin layer of vaseline or furniture wax to the tuck tape in order to make the resin mold release from the epoxy table easier.

Resin Calculator
The formula to use to calculate how much epoxy resin needed for a river table is:
Gallons Needed: Volume(Cubic Inches) * 0.004329
Quarts Needed: Volume(Cubic Inches) * 0.017316
Volume (Cubic Inches) = (Length (inches) x Width (inches) x Depth (inches)) + 10%
Please note, the 10% compensates for spills and to purchase more than the amount needed.
Obviously, the 10% is optional.
How To Mix Epoxy Resin without Bubbles
First, I should mention I performed 2 epoxy pours for this live edge river table.
The first layer filled the epoxy river roughly 3/4 and the second layer filled the remaining 1/4.
More on this later in this tutorial.
Deep pour epoxy normally requires a 2:1 mixing ratio.
So, 2 parts A to 1 part B.
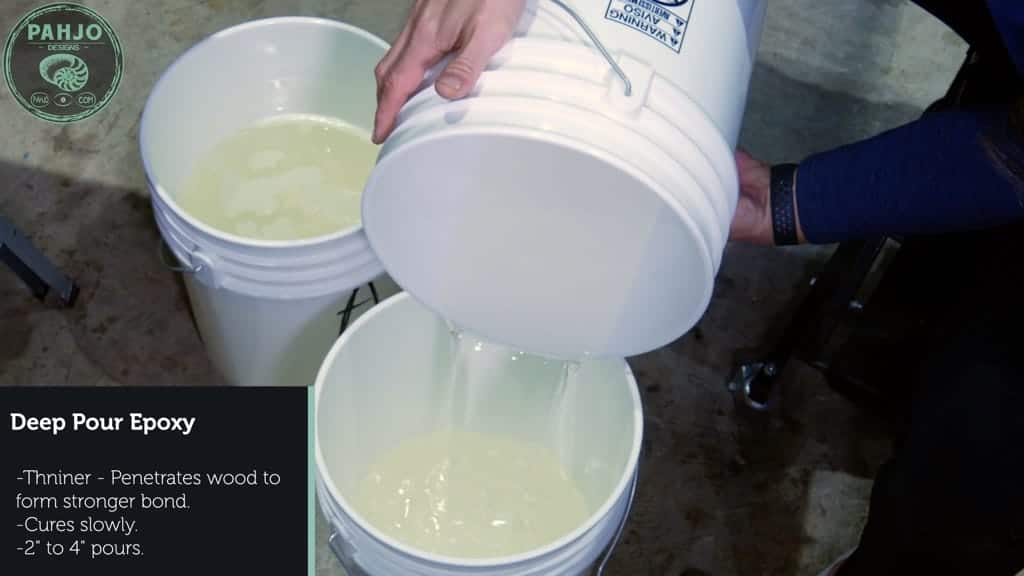
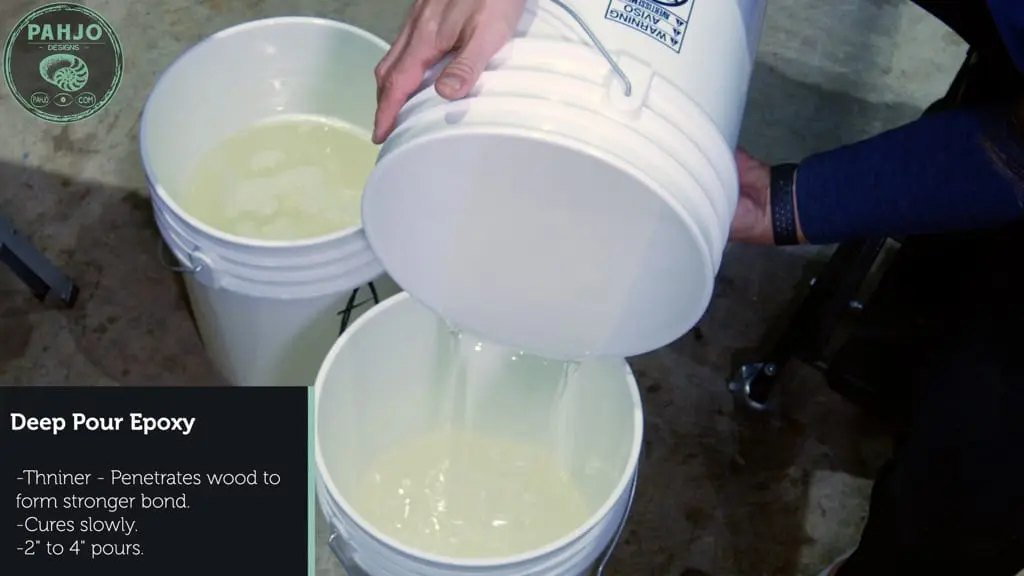
I used 3 buckets to mix epoxy resin.
By using 3 buckets, I make certain the measurements of part A and part B are accurate.
Next, I pour part A and part B in the third bucket.

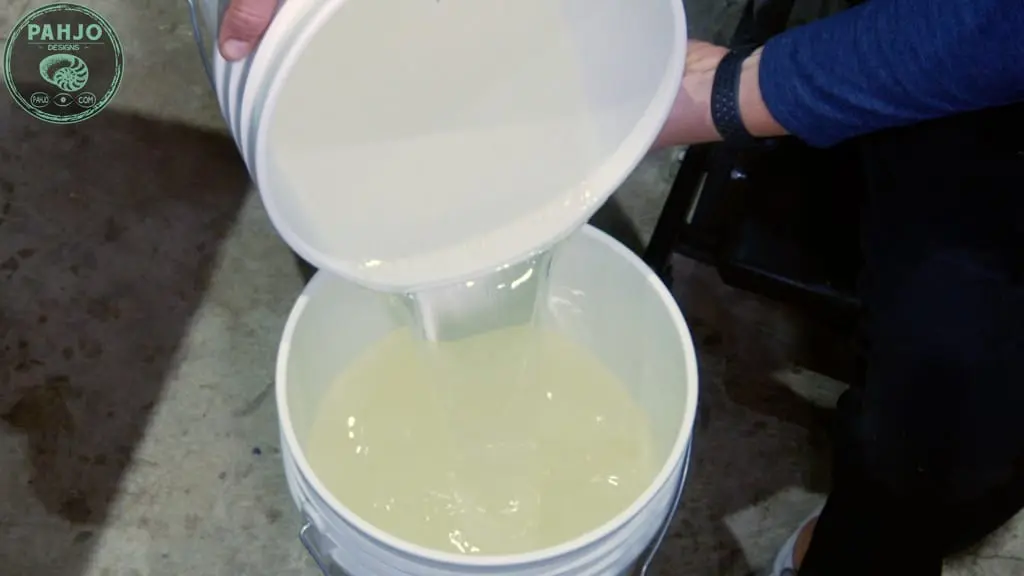
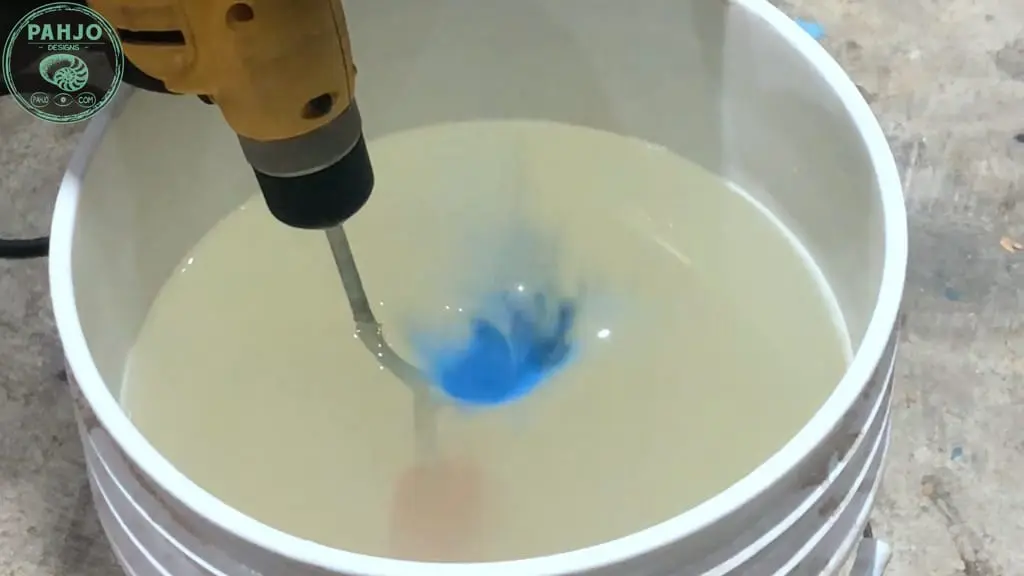
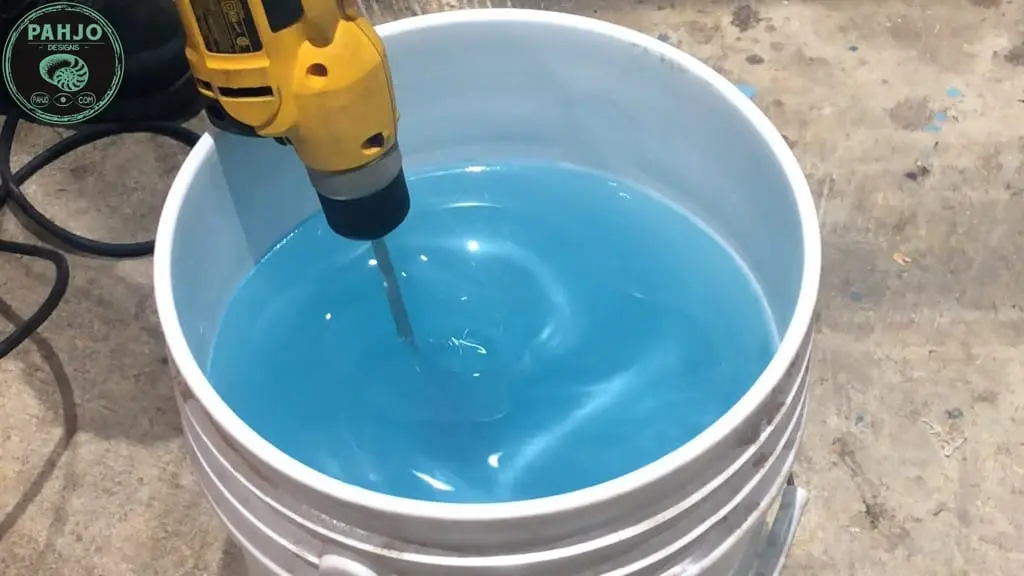
Then, I use my drill with a paddle mixing bit to mix the epoxy resin.
Epoxy resin turns cloudy when it is initially mixed. When it is appropriately mixed, it turns clear.
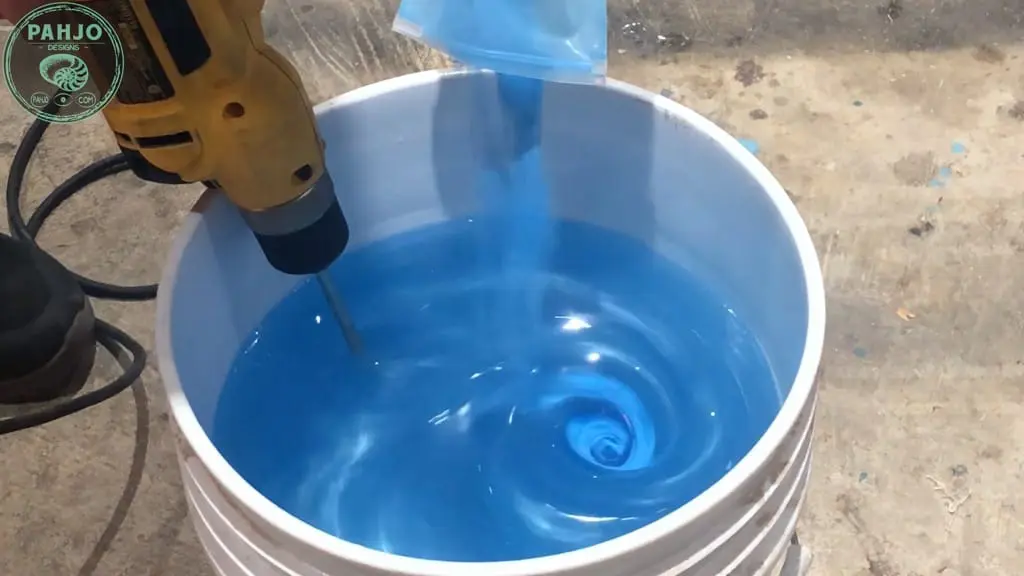
Mixing Epoxy Resin with Pigment
After the epoxy turned clear, I slowed down my drill speed and added a small amount of blue pigment mica powder.
It is a good practice to add a little pigment powder at a time – especially if this is your first time using a certain color or pigment brand.
Obviously, you can always add more if needed.


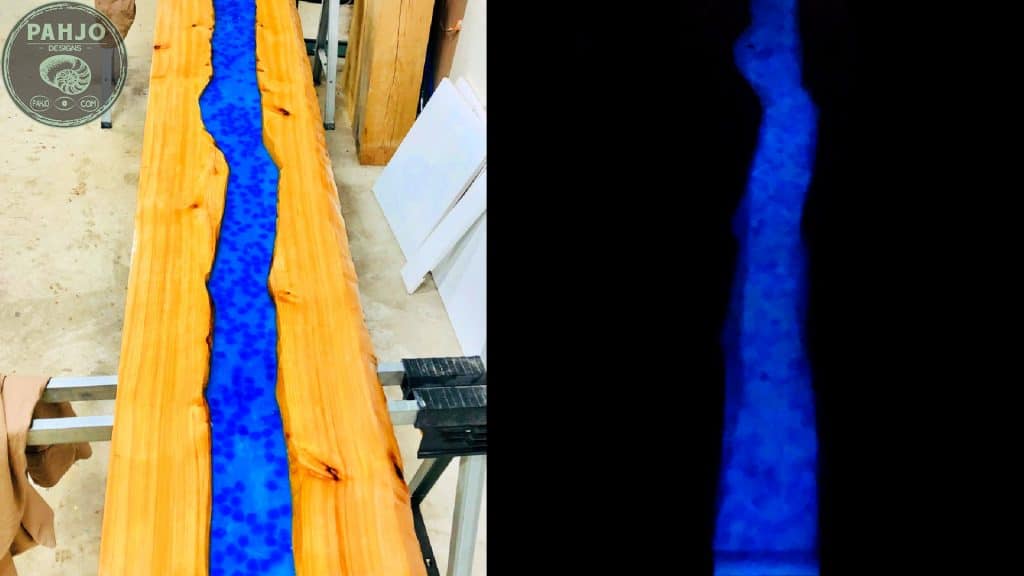
How To Mix Glow in the Dark Powder with Epoxy
Fluroscent Blue Glow PowderI use glow in the dark powder (Photoluminescent Powder) to make epoxy river glow tables often.
Photoluminescent powder is charged by natural or artificial light and glows based on the amount of light it receives.
As a result, the epoxy resin glows in the dark without lights.
I added and mixed the fluorescent blue epoxy glow powder immediately after the pigment powder.
Also, I used 16 ounces of glow powder which is plenty for this glow in the dark table top.

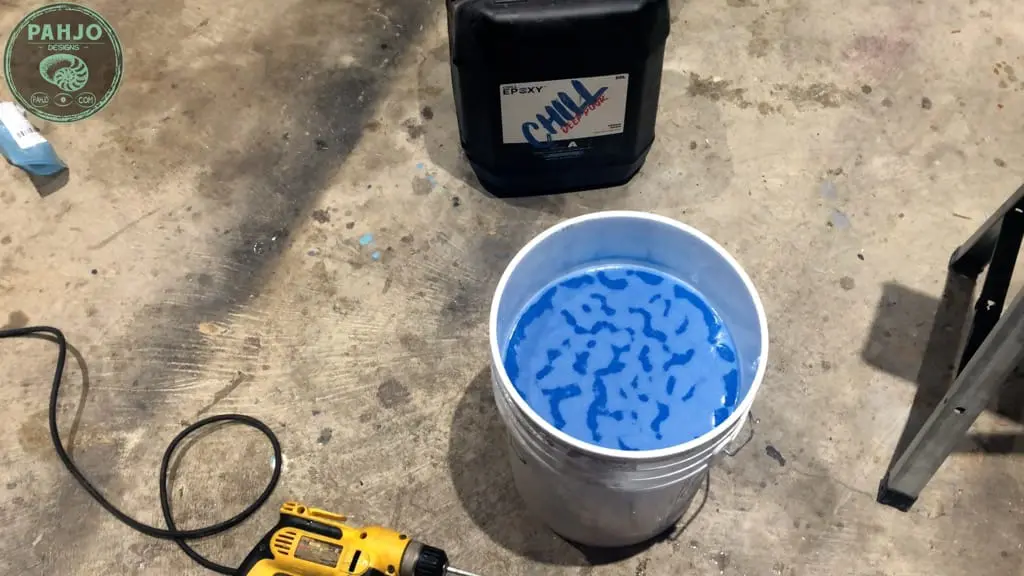
Remove Air Bubbles from Deep Pour Epoxy
To remove air bubbles form deep pour epoxy, I allow the epoxy to sit for roughly 8 to 10 minutes after mixing.
Due to the thin viscosity of deep pour epoxy, the bubbles rise to the top.
Then, I use a heat gun to remove the bubbles.

Keep in mind, this procedure will not work for table top epoxy resin with a 1:1 mixing ratio.
The thickness of table top epoxy resin prevents air bubbles from rising to the top.
DIY Live Edge River Bar Top Epoxy Pour
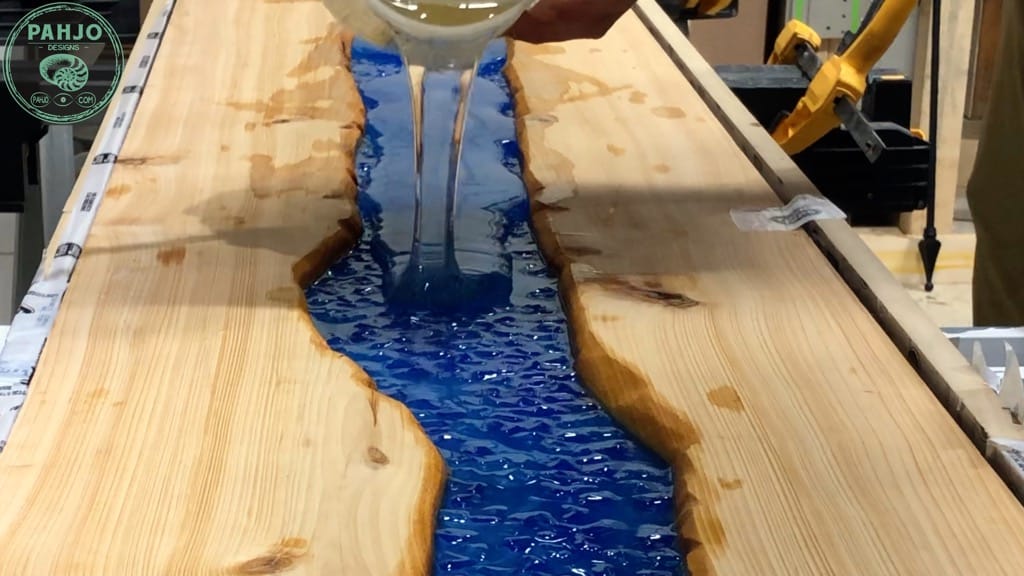
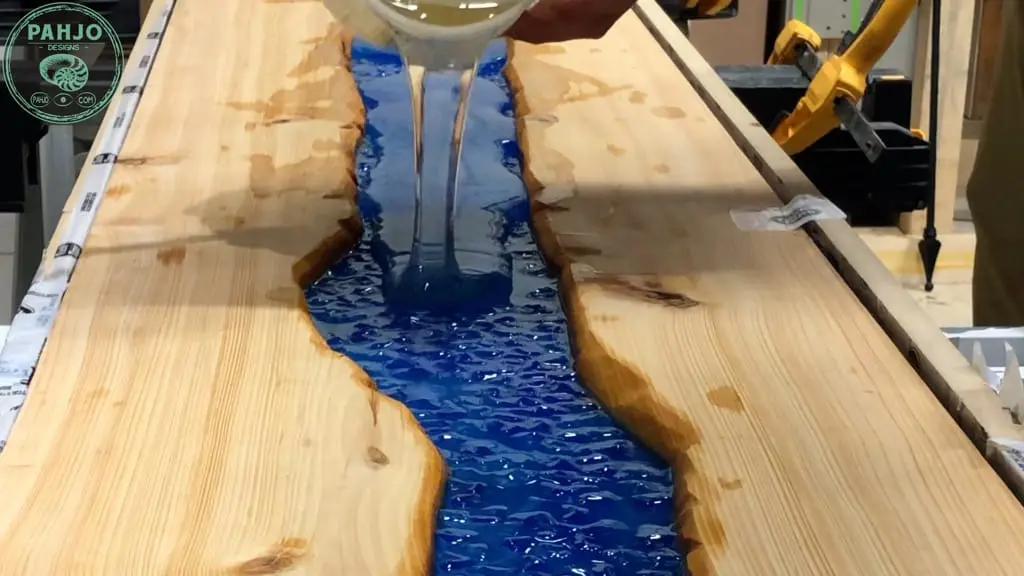
Once the all the bubbles, I slowly pour the resin on one end of the live edge bar top river table.

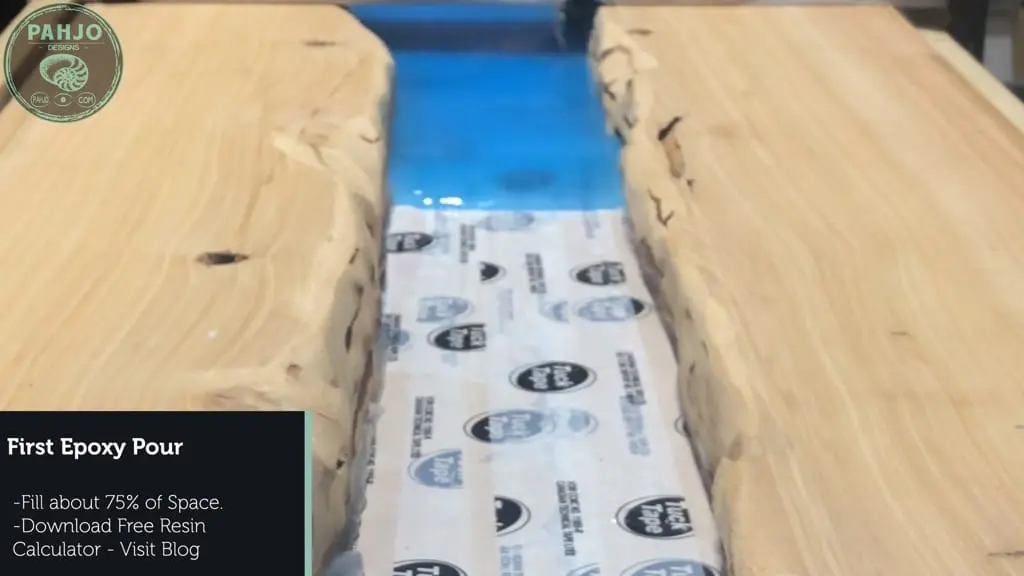


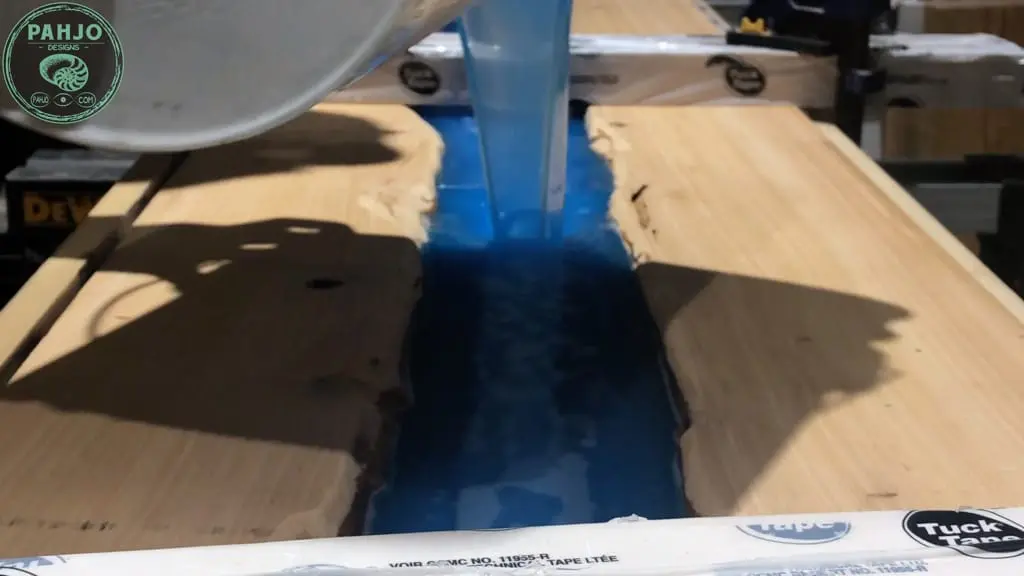
As a quick reminder, this epoxy pour will only fill the river bar top about 3/4 or 1.5”.
Next, I carefully inspect the sides, ends, and bottom of the epoxy resin table for leaks.
Use hot glue to quickly seal an epoxy leak.
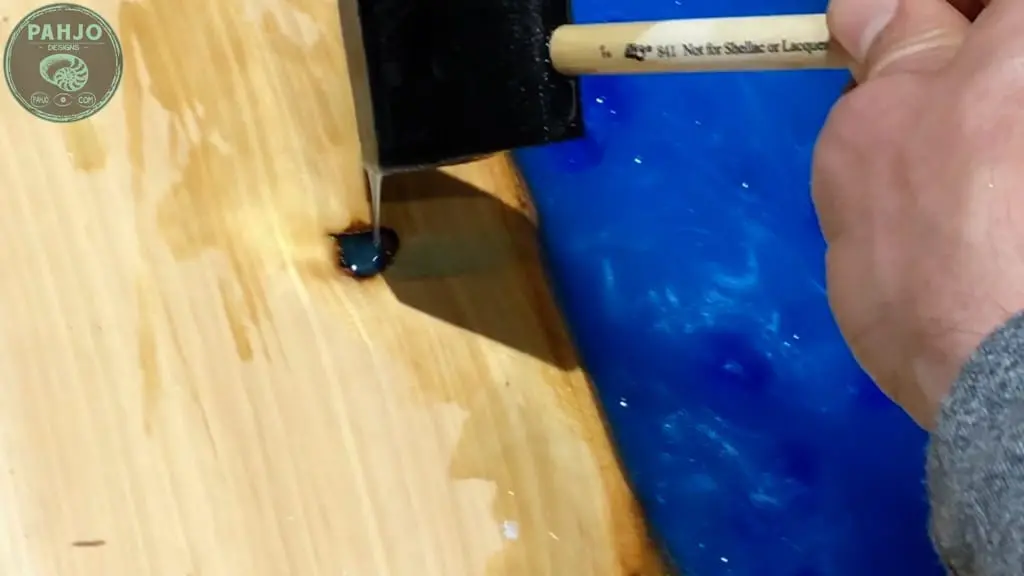
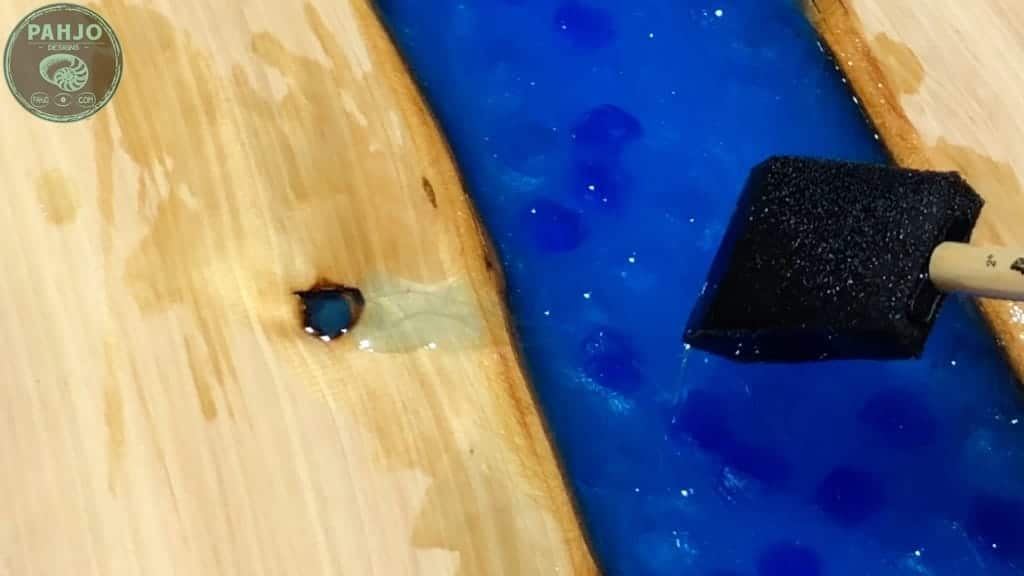
Fill Wood Knots with Epoxy
I used a finish sponge to fill wood knots with epoxy in the live edge wood.
First, I pladed the sponge in the epoxy and moved it around to absorb resin.
Next, I quickly placed it over the wood knot and allowed it to fill the knot with epoxy.


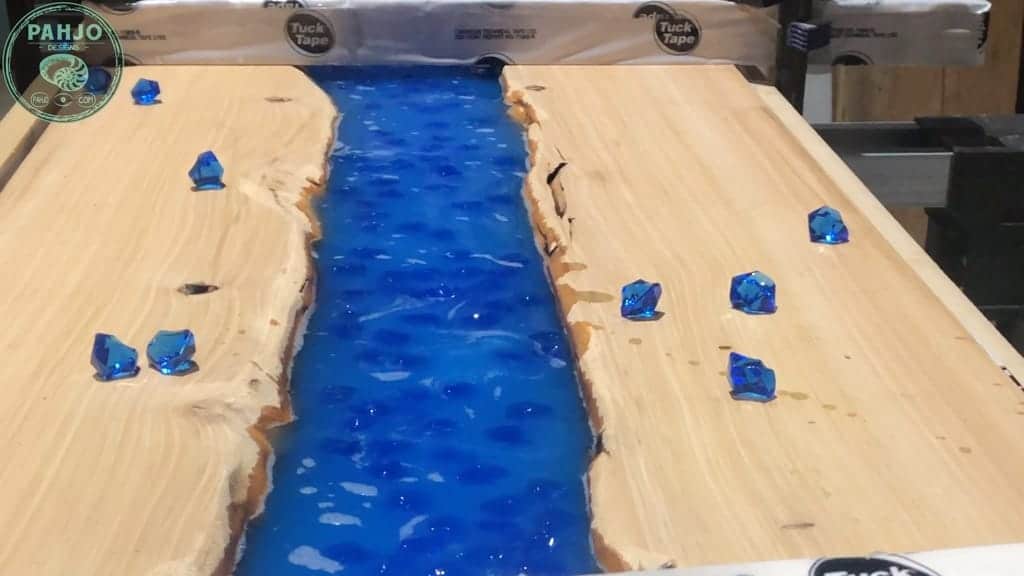
Embed Rocks in Epoxy Resin River
Acrylic RocksImmediately after the epoxy pour, I added blue acrylic rocks to the epoxy randomly.

Epoxy River Rock Table Tips
In the past, I used fire glass in river rock tables.
However, fire glass introduces a few problems:
- Fire Glass reflects light which prevents the epoxy glow powder from charging.
- Broken pieces of glass are sharp, which makes it dangerous to work with.
- Fire glass ruins or dulls saw blades if the bar top has to be cut.
- Glass sinks, which requires an additional step (thin epoxy pour on bottom) to suspend in resin.
Acrylic rocks work best for tables with rocks in the middle for the following reasons:
- They are translucent which allow light to shine through.
- Acrylic rocks are safe to work with and easy to cut.
- They float, which makes it easy to suspend in epoxy.


Since the acrylic blue rocks partially float, I left 25% (1/4” of space between the first epoxy pour with acrylic rocks and the second pour.
In other words, the second pour will adequately cover and submerge the acrylic rocks in epoxy.
Deep Pour Epoxy Curing Time
The curing time for deep pour epoxy depends on the thickness of the epoxy pour and environmental conditions.
Essentially, curing time varies and it is not an exact science.
In my experience, epoxy pours 2” or greater require 5 to 7 days to completely cure.
However, river tables requiring multiple epoxy pours do not have to wait 5 to 7 days.
How Long Between Epoxy Pours?
First, it is best to pour a second layer of epoxy once the first coat is tacky.
Essentially, the tackiness of the first layer provides a suitable surface for the second epoxy layer to adhere to.
Epoxy Thumbprint Test
I use the ‘Thumbprint’ test when adding a second epoxy pour.
If I place my thumb on the first layer of epoxy and it leaves a fingerprint without sticking to my thumb, it is ready for the second pour.
At times, the epoxy cures quickly and I cannot leave a thumbprint in the epoxy.
If this happens, I lightly scuff the surface with a scotch brite pad or 400-1000 grit sandpaper before applying the second layer of epoxy.
The high grit sandpaper scuffs the surface just enough to provide the second layer a surface to bond to.
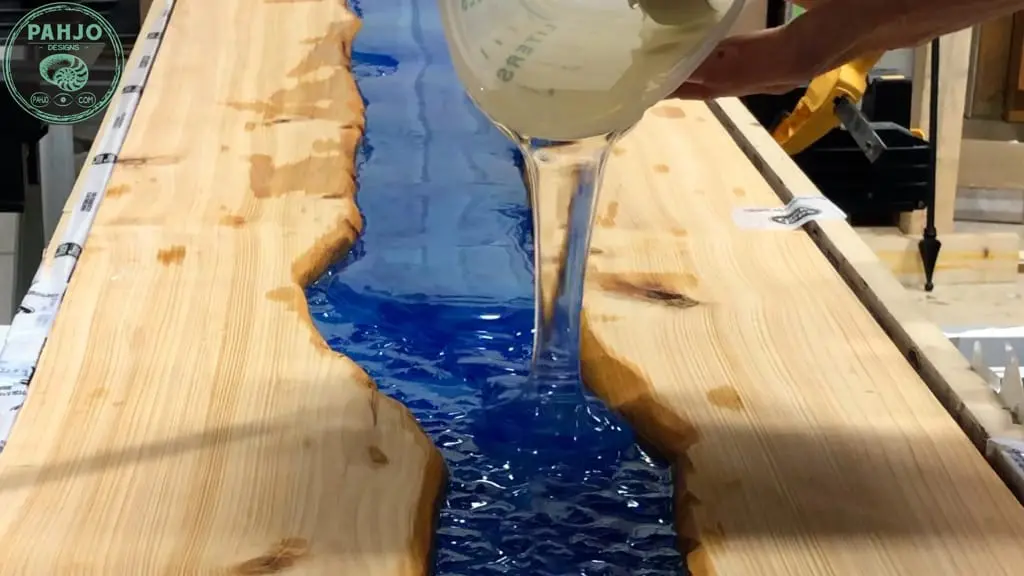
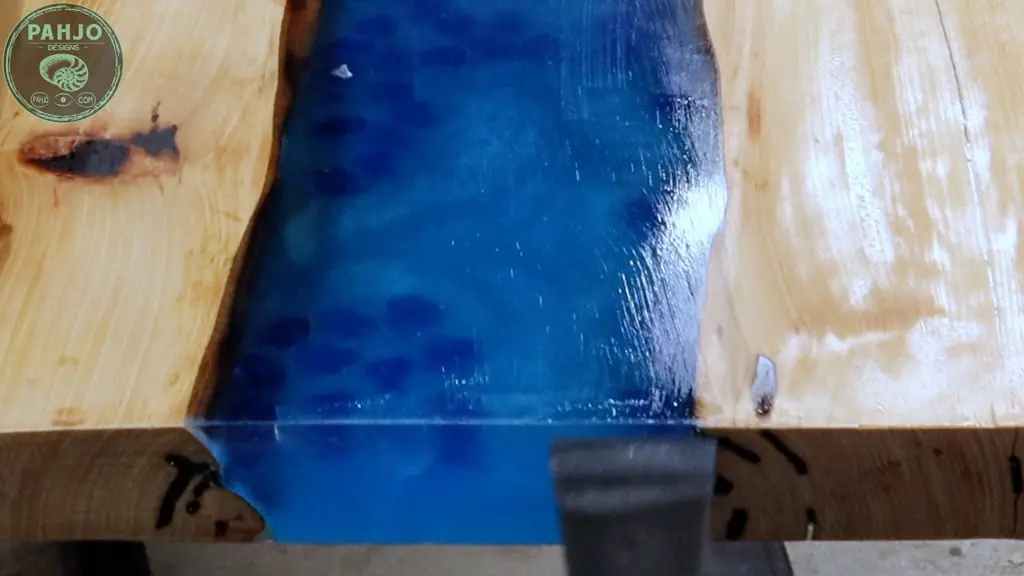
Clear Table Top Epoxy
Table top epoxy cures faster, requires a 1:1 mixing ratio, and generates more heat than deep pour epoxy.
With this in mind, I chose to allow the deep pour epoxy completely cure before adding the second layer of total boat table top epoxy.
So, I proceeded to the second pour.
For the second epoxy pour, I determined the amount of resin I needed to fill the live edge epoxy bar top river table up to the surface.
Next, I mixed the resin according to the manufacturer’s instructions and poured the table top epoxy in the river.
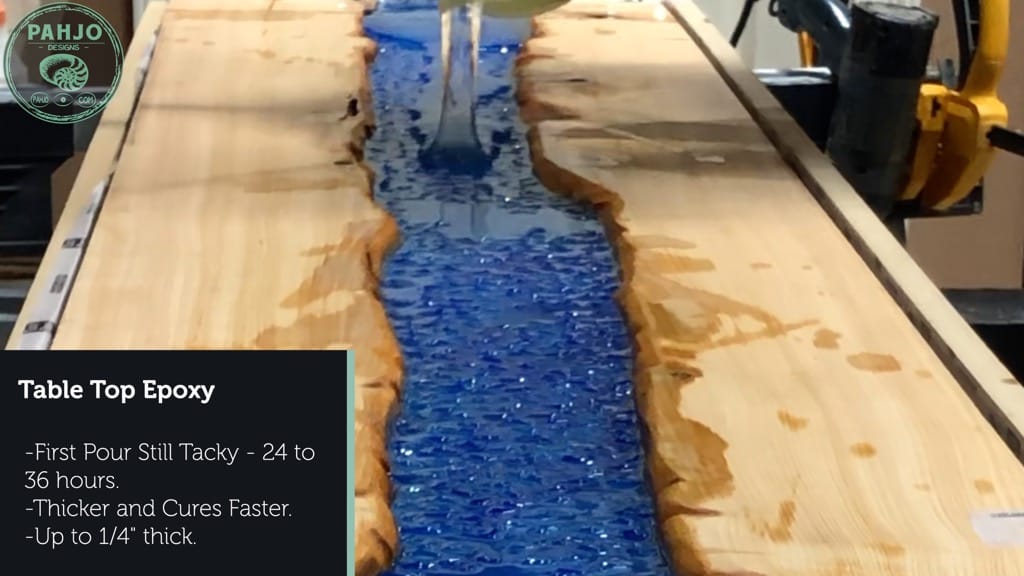

Due to the thickness of table top epoxy, I distributed the pour down the river instead of pouring only at one end.

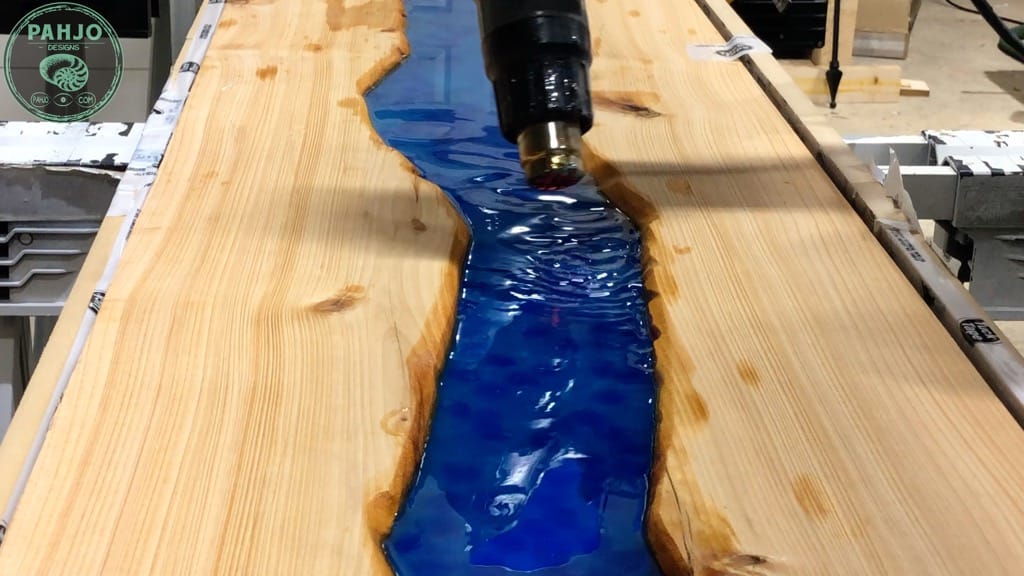
Remove Table Top Epoxy Air Bubbles
Heat GunNext, I used my heat gun to remove epoxy air bubbles from the table top epoxy.

Demold Epoxy River Bar Top
Before I removed the DIY live edge river table from the mold, I turned off the lights to see it glow in the dark.
Since the table sits in the dark for most of the day in my shop, the glow powder doesn’t charge that much.
Keep in mind, glow powder needs sunlight or artificial light to charge.


To demold the epoxy live edge bar top, I simply used a pry bar and gently lifted up all around the river table.
The table released from the resin mold very easily.
Obviously, sheathing tape and vaseline work really well for epoxy molds.
In fact, I reuse most of my resin molds numerous times before I discard them.
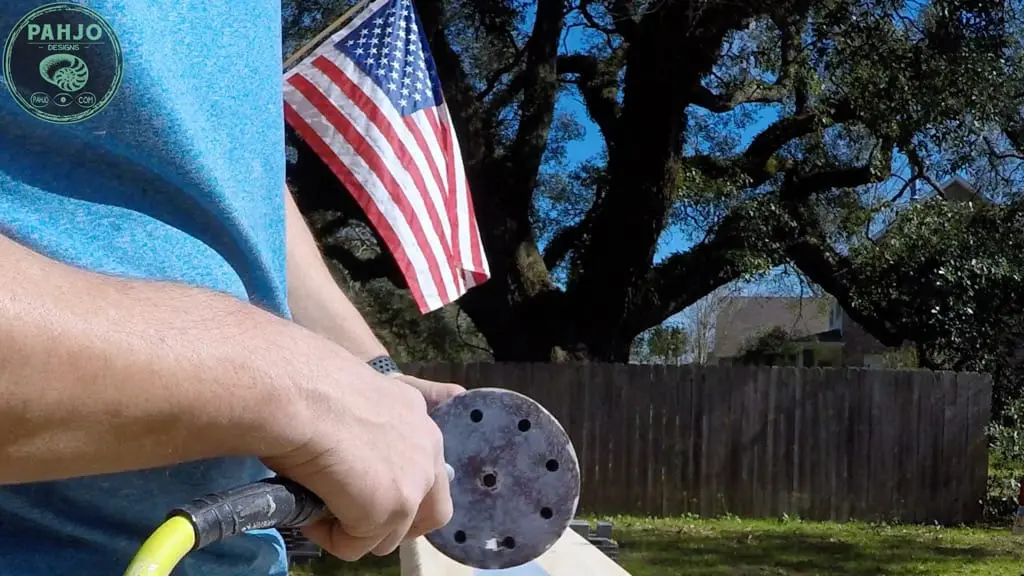
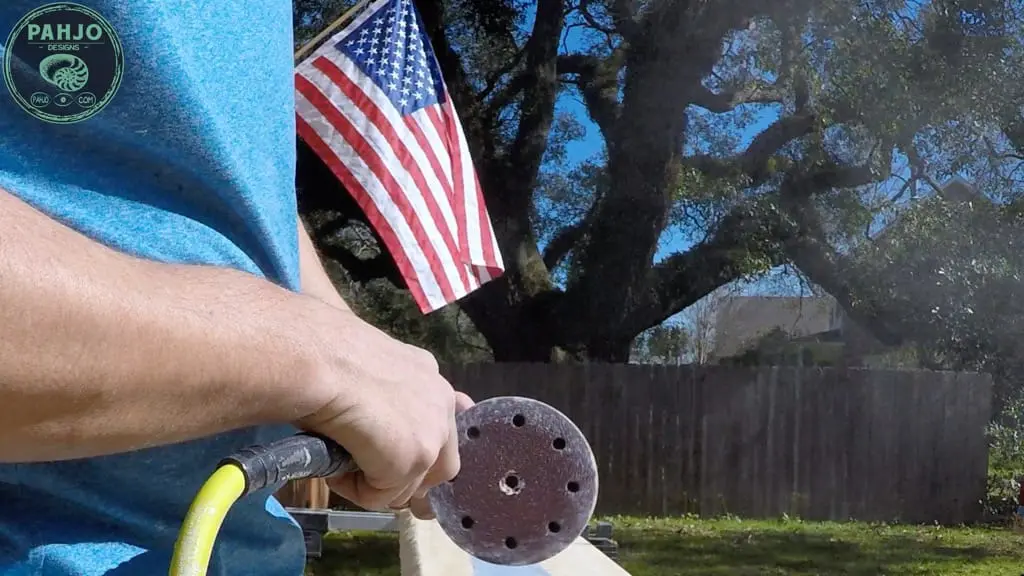
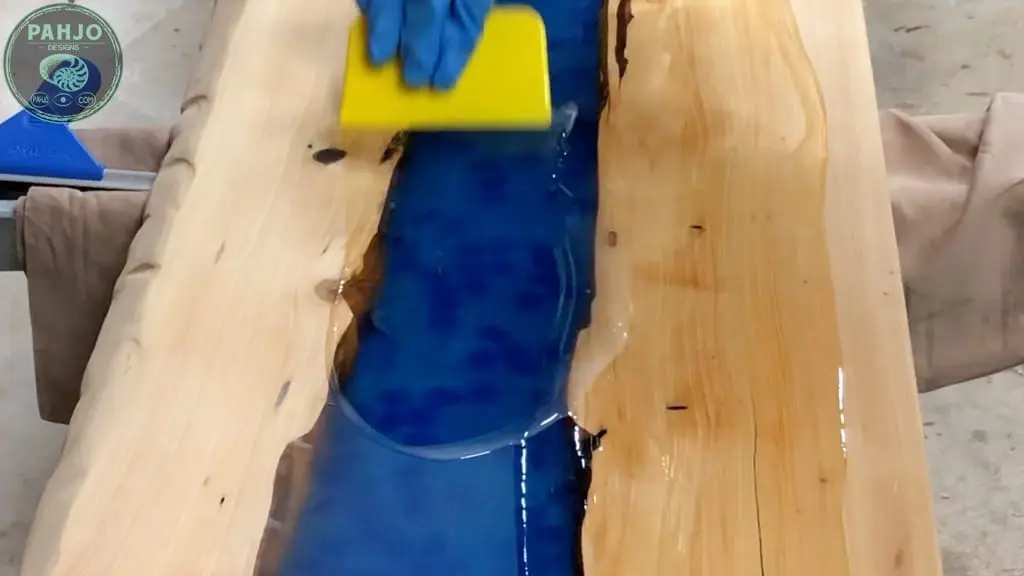
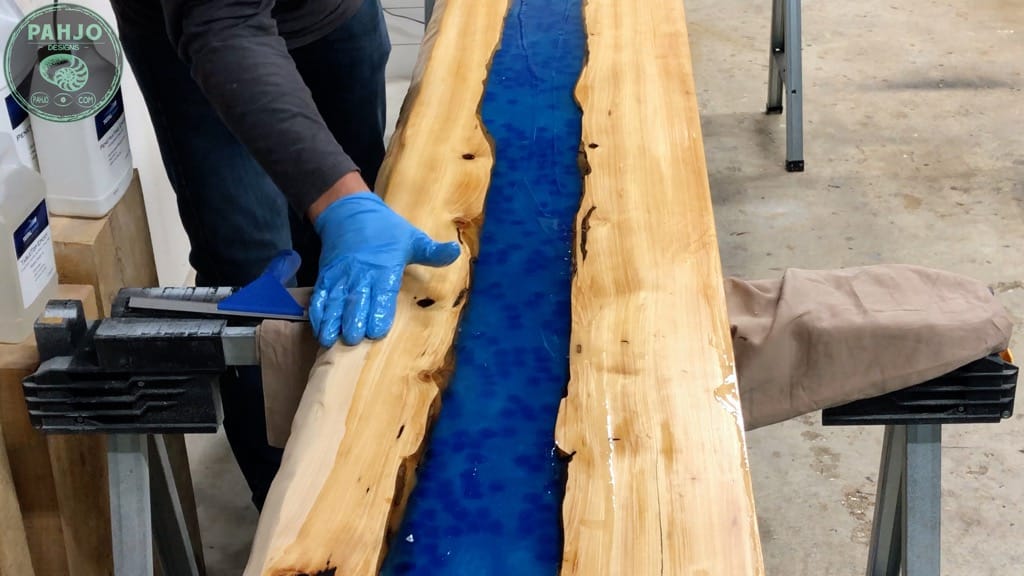
How To Sand Epoxy Wood Surfaces
I wrote a detailed tutorial explaining my technique on how to sand epoxy resin.
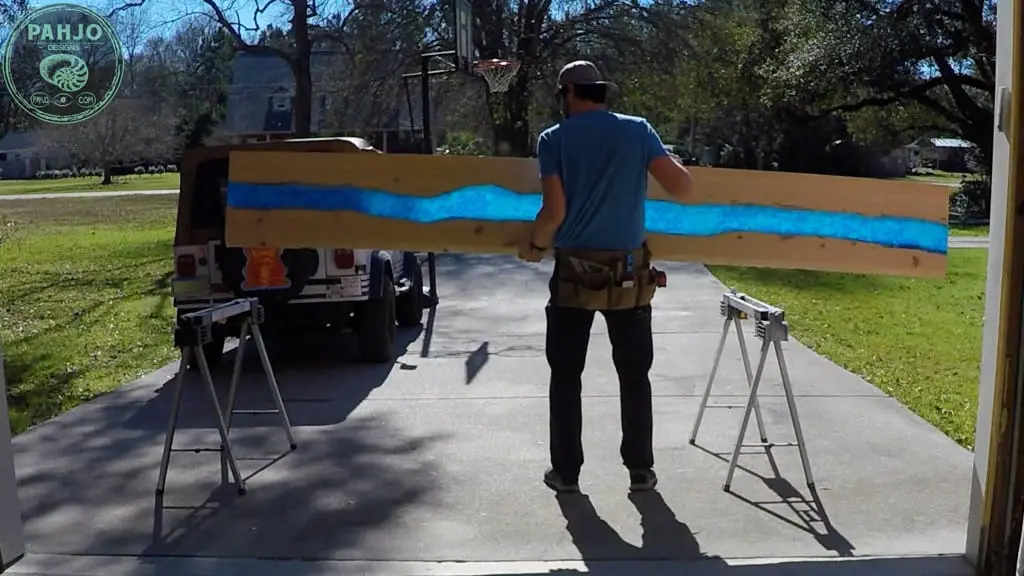
First, I always sand epoxy tables outside if possible.
So, I carried the epoxy table outside and placed it on my saw horses.

I use an air compressor to clean the resin build-up on the sandpaper while sanding.
As a result, this produces an enormous amount of dust.


After building many epoxy wood tables, I believe I perfected an epoxy wood table sanding technique that produces great results.
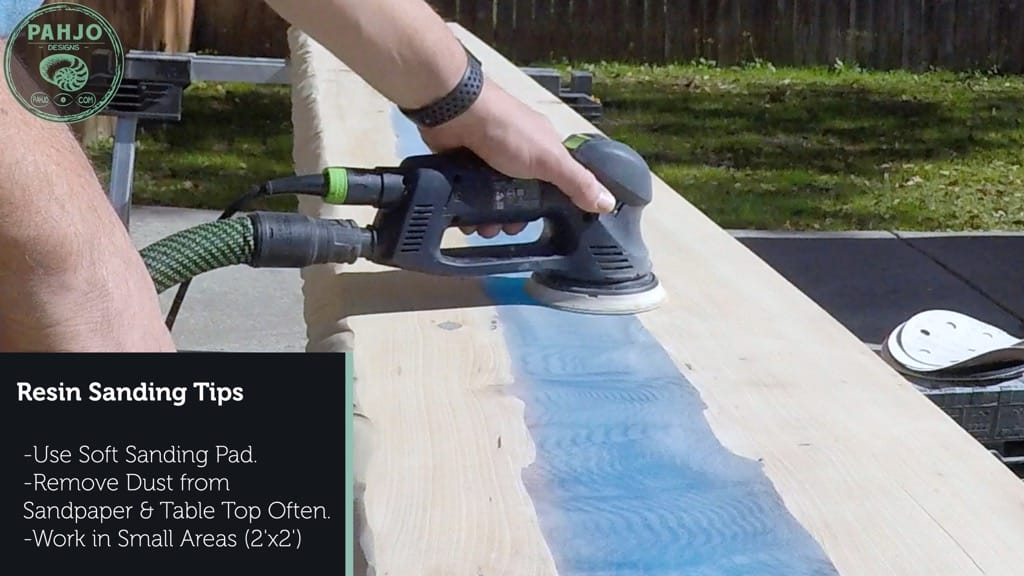
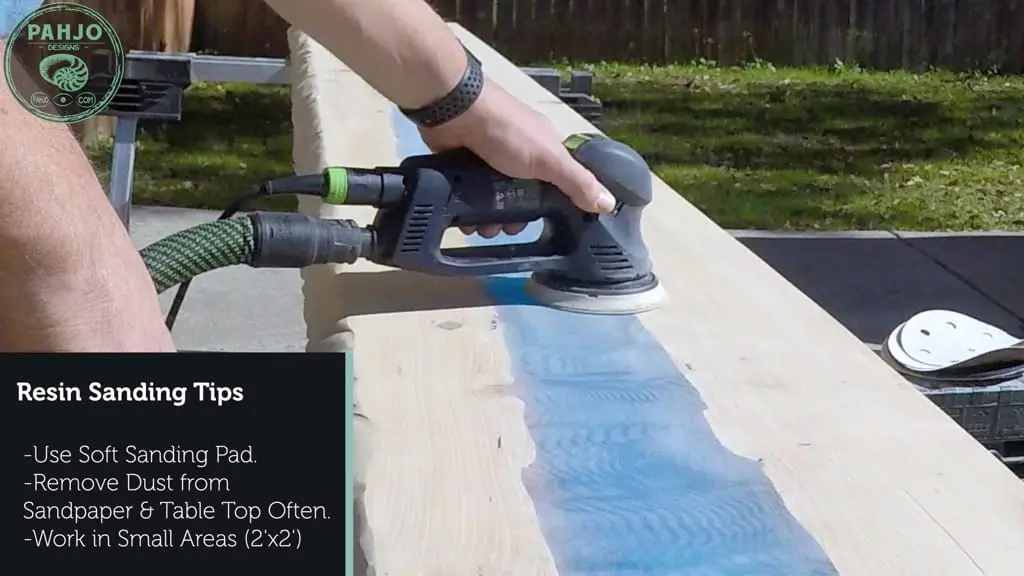
Additionally, I can get a matte finish on epoxy, satin, semi-gloss, or gloss sheen level.
Outdoor Epoxy for Wood
This live edge epoxy river bar top table will be used under a patio.
As a result, it needs a durable outdoor wood finish to withstand the exterior elements.
UV Resistant Epoxy
First, I should mention to you that no epoxy table top resin can withstand direct sunlight or constant exposure to exterior elements.
I realize some manufacturers produce UV epoxy.
However, this doesn’t fully protect it from direct exposure.
The UV inhibitors delay the epoxy yellowing and other common problems such as cracking, de-lamination.
Additionally, Hindered Amine Light Stabilizer (HALS) is a newer epoxy additive that further prevents yellowing.
Protect Outdoor Epoxy Bar Top
Again, UV inhibitors and HALS simply delay the inevitable.
I wrote a detailed article on how to protect an outdoor epoxy bar top after I learned a hard lesson.
If not protected properly, the heat from the sun and UV rays will soften/weaken the epoxy surface and moisture will creep in.
Once this happens, ball game is over.
With this in mind, epoxy can survive outdoors under these 2 conditions:
- Direct sun exposure is eliminated altogether.
- The epoxy surface is inspected monthly and maintained annually.
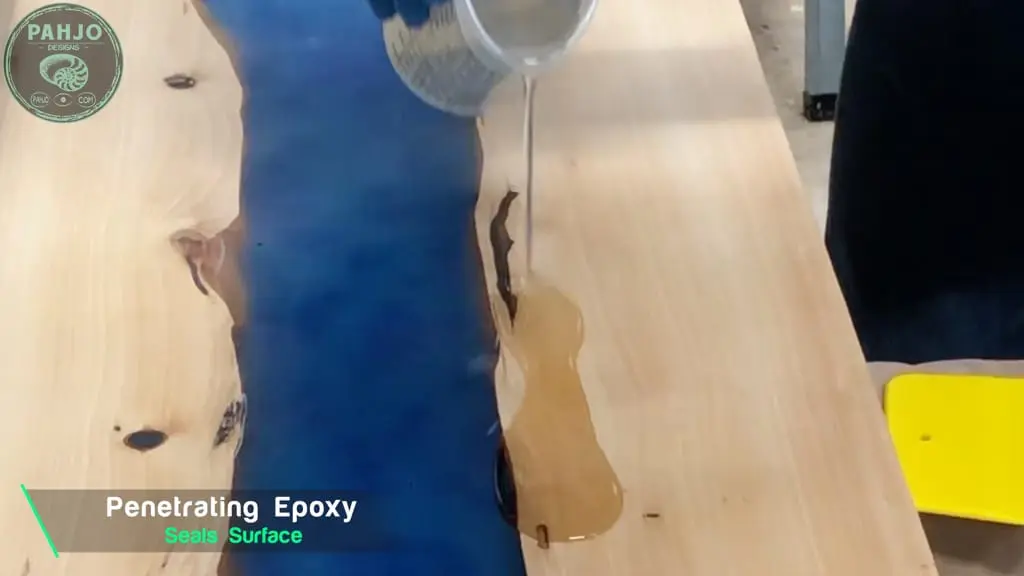
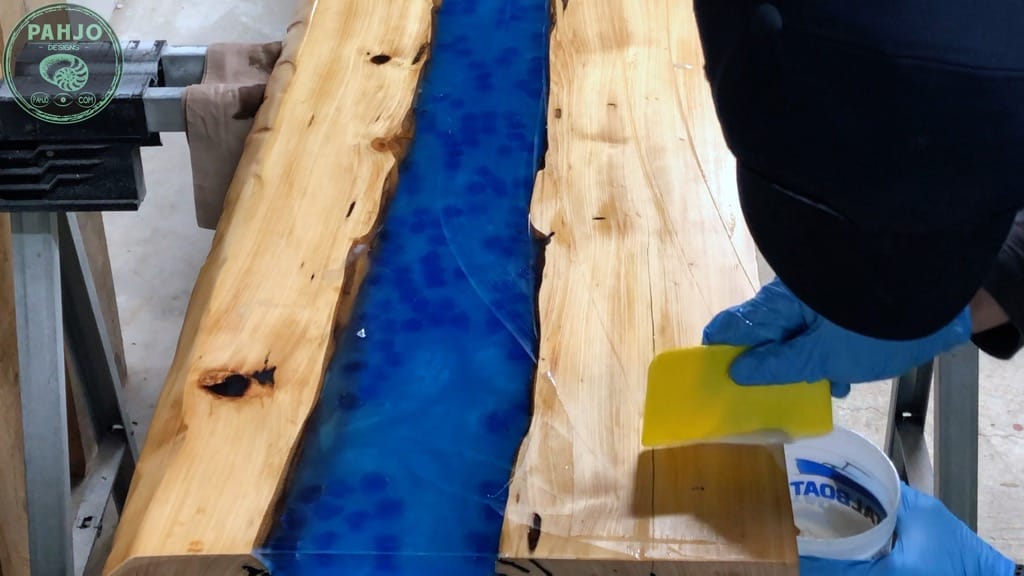
Apply Penetrating Epoxy
The marine industry makes great products to protect wood surfaces as well as epoxy.
So, I called my friends at TotalBoat and explained my project to them.
Essentially, they recommended I use 2 products to protect my live edge epoxy river table from the outdoor elements.

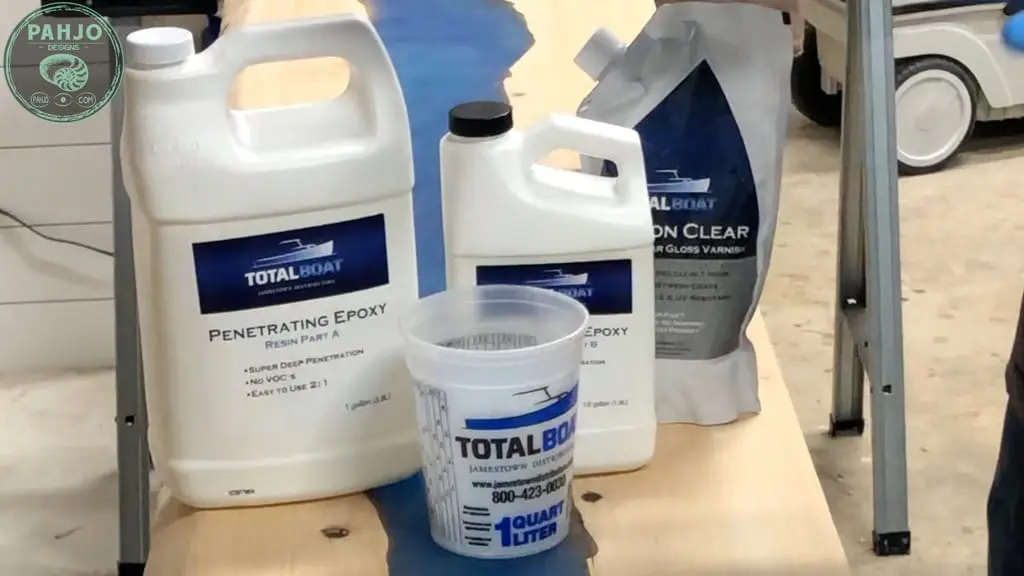
First, I used penetrating epoxy on the epoxy wood river table to seal the surface.
Penetrating epoxy is super thin which allows it to penetrate deep into cracks and crevices.


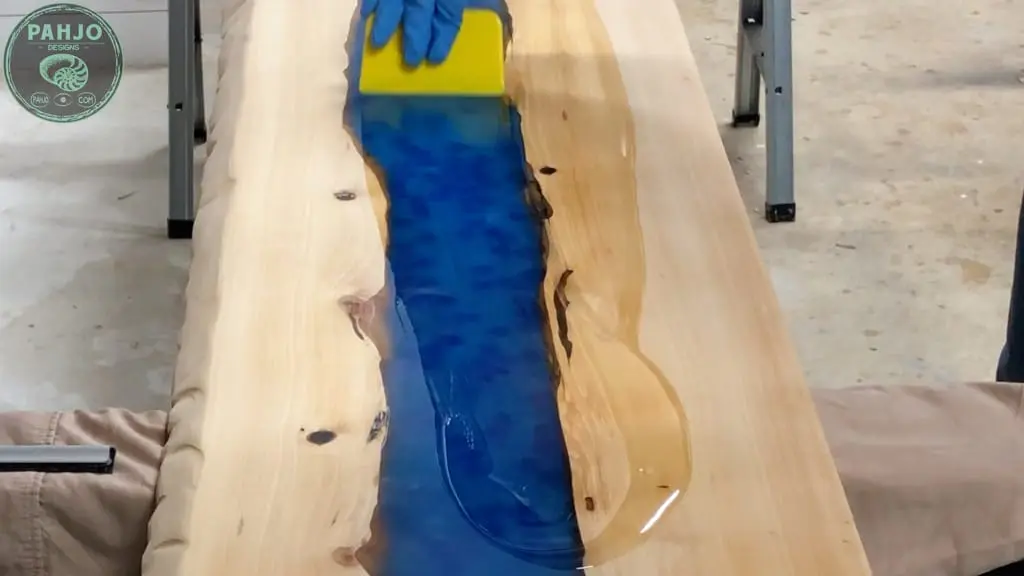


Outdoor Epoxy Wood Varnish
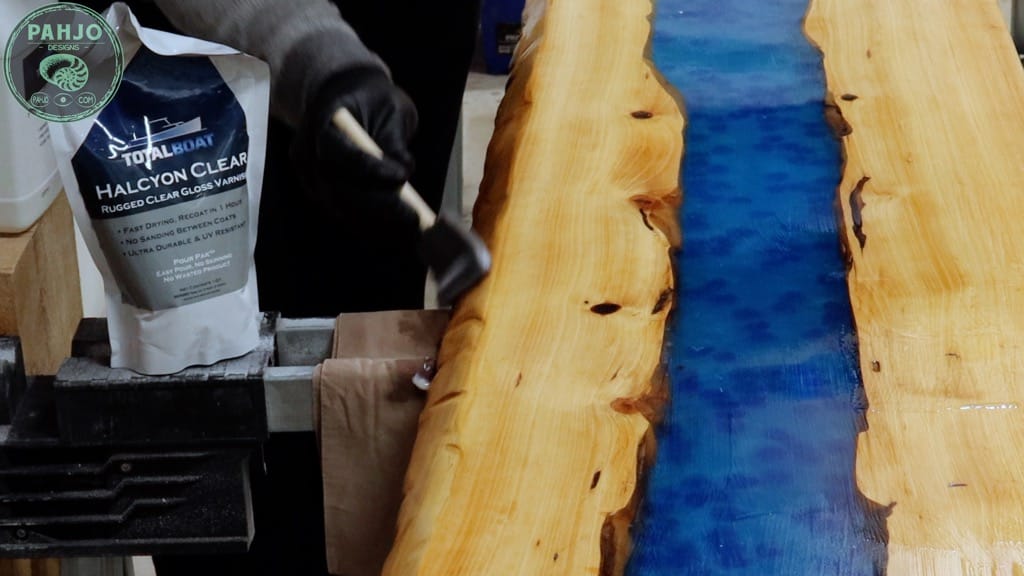
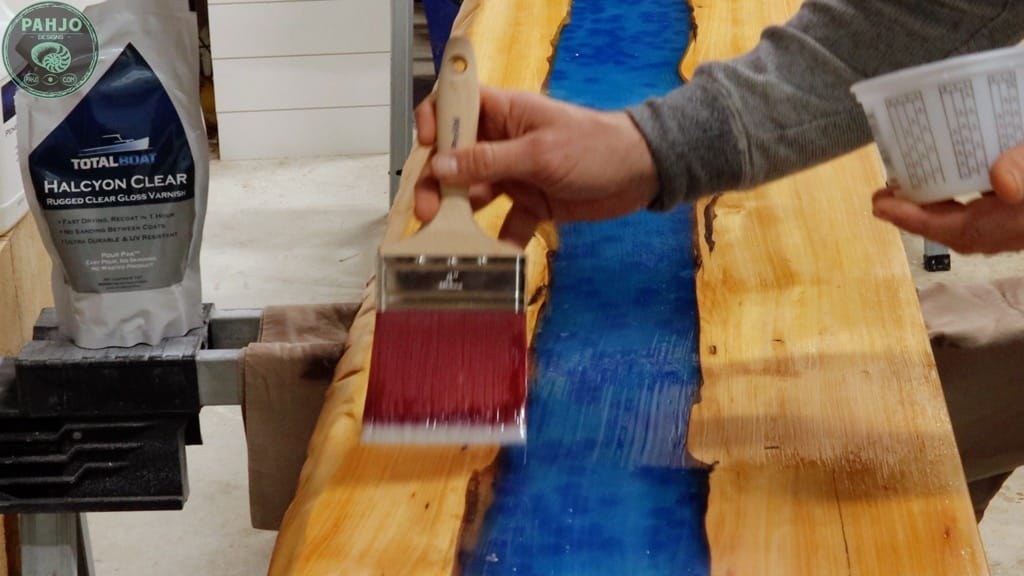
Next, I used Halcyon Clear Gloss Varnish.
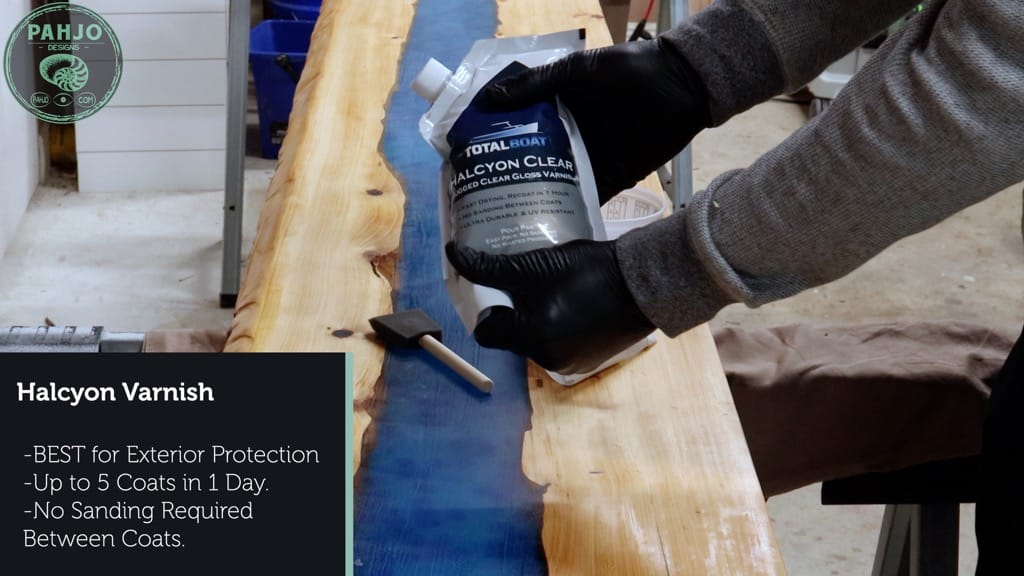

Halcyon varnish is great to use because:
- Water Based Formula
- Dries quickly
- Allows up to 5 coats in one day
- Doesn’t require sanding between coats
I applied 5 coats to this outdoor epoxy wood table and it was ready to go.
This stuff is truly remarkable – THANK YOU TotalBoat.


DIY Live Edge Epoxy Bar Top Ideas
The following list of epoxy river tables should give you ideas and inspiration.
Additionally, use the techniques in this tutorial for each of the following live edge epoxy river bar top table ideas.
- Epoxy Wood Slab Bar Top
- Transparent Epoxy River Rock Table
- How to Make an Ocean Table
- Epoxy Seashell Table
- How To Make an Epoxy Resin River Table (Glow In the Dark Table)
Conclusion
In conclusion, I hope this tutorial showed you how to build a DIY live edge river table with epoxy.
Also, leave a comment down below if you have any questions, comments, or just want to say ‘hello’.

Frequently Asked Questions
Although bark on a live edge table looks great, you should not leave the loose bark on the live edge.
The best wood for a live edge table is black walnut, cherry, redwood, and maple.
To make a table glow in the dark, you can add LED lights to the underside. Or, you can make an epoxy river table and add glow powder to the epoxy.
The best epoxy resin for tables depends on the application. For most scenarios, TotalBoat Table Top Epoxy is a great epoxy resin to use for almost all projects. The best epoxy for thick pours is Liquid Glass Superclear 2.0.
Alan" ace"Cullum
Monday 28th of December 2020
How do I contact you about a build. two, 8' or 10' or 12' long (preferred 12feet) sinker cypress. thanks, ace